ReproScripts Imposition Auto imposition plugin for CorelDraw
- automatic imposition in CorelDraw in few clicks
- designed for digital and offset printing
- placement of jobs in the layout, including two-sided printing
- all printing marks, scales and text are added
- precise bleed control for each design or entire layout
The Auto imposition plugin is included in the ReproScripts Imposition library oriented to the tasks of the automated imposition creation of printing jobs while preparing them for the output. The plugin allows you to quickly create a layout, taking into account the features of the printing equipment used. For offset printing, the plugin prepares a file ready for output on the CTP device, correctly positioning the layout on the printing plate and adding the necessary technical information. Also Auto imposition can be used for layout of jobs for digital and other types of printing where plates are not required. The plugin automatically calculates the number of places occupied by each job on a printed sheet, taking into account the necessary circulation, makes two-sided layouts and allows you to flexibly manage important parameters using an easy, not overloaded interface.
All finished layouts are saved as CorelDraw files and the plugin keeps detailed information about them in the list of projects. This allows you to return to the performed imposition for control in case of problems at printing stage, or simply quickly to repeat the order.
Quick start
 WATCH VIDEO: Automated imposition in CorelDraw

In order to use the plugin, you must perform a presetting — this is described in detail later on this page. To quickly get started and understand how the plugin works, you need to follow these steps:
- Enter the settings of the plugin by clicking on the button with the gear icon in the lower right corner of the window 1 and add the printing machine whose parameters will be used for the layout. It is necessary to add a list of the sizes of the papers 2 supported by the press.
- In the project manager at the top of the form add a new project 3 by clicking and specifying the desired name
- Select a printing press and a paper to print on 4
- Open a CorelDraw document that you want to impose and include it in the project stations list by clicking on the button in the list's header 5
- Change the parameters of bleed, marks, etc., if desired, and create the layout by clicking the button.
How the plugin works
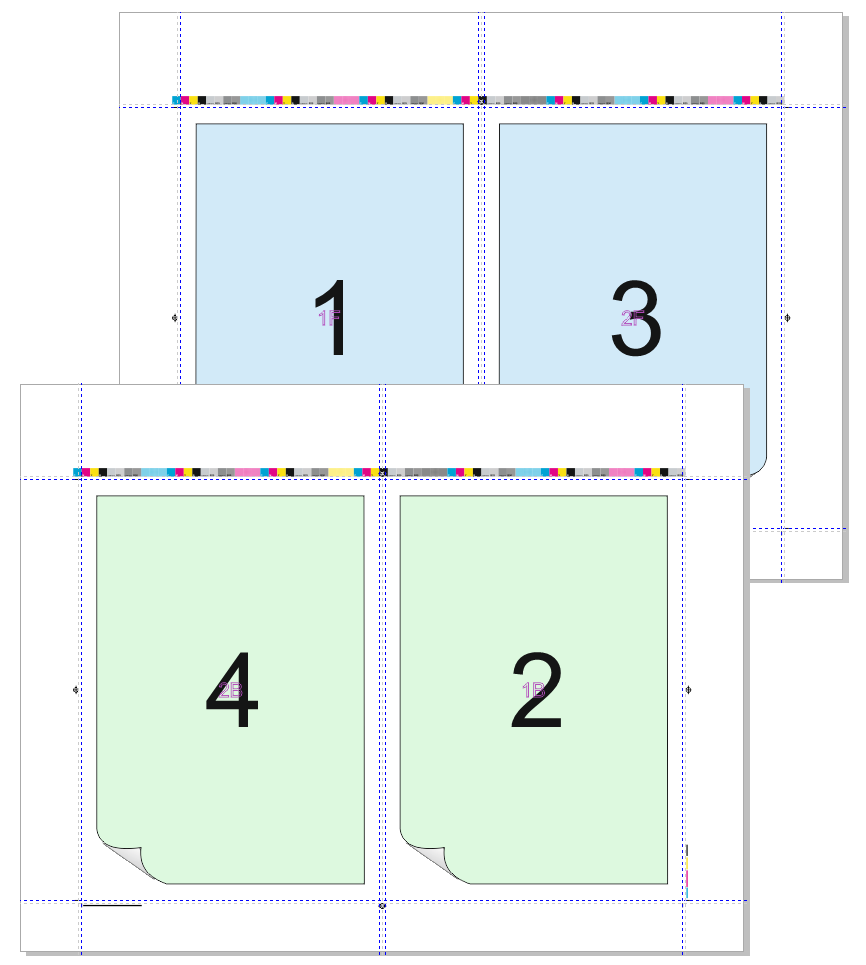
To create imposition for one or more CorelDraw files the plugin calculates and allocates space on printing sheets for all jobs (=stations) included in the project list. Stations can come from one or from different documents. The only requirement is that they must be the same size — the plugin does not perform imposition for jobs of different sizes. For each station, you can specify its quantity and whether it is the front or back side of the job. This information is sufficient to calculate the number of places occupied by the station on the printing sheet. The plugin determines the quantity of printed sheets necessary to reach the required circulation for every station, arranges the printed marks and places the job in their positions, adding bleed from each side if necessary.
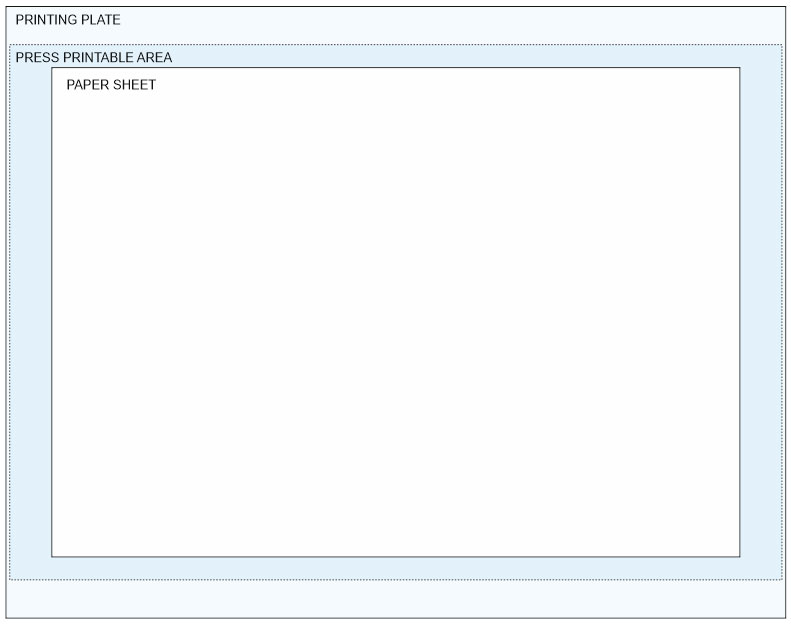
When calculating the layout, the printable area is defined as minimal from the printable area of the press and the size of the paper used. Obviously, the whole layout including printing marks, should fit within it.
Printing presses, in terms of the plugin, are divided into those that use plates (= offset) or those for which plates are not required (= digit). The plugin determines the optimal orientation of the job (taking into account the front and back sides of the design) and forms the layout.
If the parameters of the selected printing press indicate that it does not use plates, then the plugin's work is completed. For presses that use plates, the plugin performs an additional positioning operation of the finished layout within the plate boundaries and optionally adds graphics and text specified in the settings. As a result you get an imposition file completely ready to be sent to CTP, in which all the necessary technological indents are taken into account and all the required information is added.
Setting up the printing press
For the plugin to work, information about the parameters of the printing press used is required. They can be specified in the plugin's settings by clicking on the button with the gear in the lower right corner of the form. The list of printing machines, and all their parameters, available in this form are shared between all ReproScripts plugins. Any changes will affect all of them.
Click in the list of presses and specify its name. For each machine, you need to create a list of paper sizes it supports and specify a default papers size which will be used for new projects with this printing press 1. Opened papers list by button button add fill in the sizes of paper that you use when printing on this press. These sizes will be used by the plugin when imposing.

There are four fields in the group next to the list of papers 2 that allow to specify technological non-prinable areas for paper. The will be automatically subtracted from the sizes of the selected paper during imposition, thus ensuring that the entire layout, with the all marks, gets into the printable area of the paper sheet.
By default, the plugin uses sizes for printing marks that are common for all library plugins. They are configured in the Printing marks tab of the settings form (as well as in the settings of other plugins). If such "averaged" marks are not suitable for the current press, then check the box for custom printing marks and specify the necessary values that will be used for this machine.

For digital presses, and other types of presses that do not use printing plates, the setting up is completed. For offset printing, you need to set the size of the printed plates used. This is necessary for the correct positioning of the layout on the plate when outputting to CTP. Check the box press uses printing plates and set the size of the plate in the orientation in which it is used for printing. 3 You can also optionally set the maximum printable area of the press for additional control by the plugin when performing the imposition. This is useful if the press allows you to use paper larger than its printable area. As well you need to specify the placement of the finished layout on the printed plate. Set the horizontal and vertical alignment and the shift in the desired direction after alignment. Based on these data, the plugin aligns and moves created layout to the correct position.
When you fill in the list of papers for printing presses which use plates, a button is available. 5 It allows to automatically complete the list with the most popular standard paper formats that fit on the plate. But in any case the list can always be edited and supplemented with any other values.
Additionally, you can add fixed text and graphic elements to the plate. 4 Printing scales, logos, etc. prepared in CorelDraw can serve as such graphic elements. In order to place them on the plate, you need:
- prepare a single-page file in CorelDraw format
- place it in a folder that is always accessible to the plugin
- add the file to the list by clicking on the button on the under Plate graphics header
Coordinates X and Y are counted from the lower left corner of the printing plate to the lower left corner of the file page with the element being placed. Most often the graphics in a file intended for placement on the CTP should be painted in the Registration color, so that it visible at each plate when performing color separation.
Projects management
Many of the ReproScripts plugins use projects to organize their work. Each project contains complete information for them to carry out the required task. Auto imposition keeps in projects the list of stations used for imposition, printing machine, layout settings, etc.

There is a project manager control at the top of the plugin's window. To create a new project, click the button and give it a name. As a name, we recommend using the job order number. This will allow you to easily navigate in the list of projects. If you make any changes to the project, you must save it by clicking on the button with a floppy disk .
To access additional project manager commands, you can click on the button. From the menu that opens, you can delete the project or save it under a different name. You can also use the import/export commands to move a project from one location to another, which will allow you to save the current project to the selected folder or load an external project into the list.
The plugin supports master projects. The master contains parameters that are reused during the creation of new projects. This approach exludes the need to re-enter the same data for each project and, at the same time, have any number of presets "by default".

-
For example, if you create
- Template 1 - in which the bleed is 2 mm, offset press / color scale required
- Template 2 - bleed 0 mm, offset press / without a scale.
Then at the time of creating a new project, a list of templates will be available to choose from. Taking as a basis Template 1 we will receive a new project in which 2 mm / offset / scale are set. If you take Template 2 as the basis, then the parameters 0 mm / offset / without scale will be loaded into it. Any project can be saved as a template by clicking on the context menu item. In this case, the project parameters will be copied to it, but not stations or colors — which change every time.
Project manager settings
In the plugin settings, which opens when you click the button with the gear in the lower right corner, the last tab allows you to configure the project manager. You can specify the folder in which the projects are saved, by default My Documents\ReproScripts\RSLY is used.

If you regularly use the plugin, you can accumulate a large number of projects, in order to limit their list in the manager, you can check the box do not show projects older than and specify maximum age for the projects to be included in the list. This is convenient because typically you do not often have to come back to old projects.
it is possible as well to specify the default template which will be automatically offered for each new project. For this purpose it is reasonable to create a project with the most frequently used parameters.
Projects and templates are saved as regular files on the disk, with the same names that are specified in the plugin. In order not to complicate the interface of the plugin, there is no possibility to rename or delete such files exists in the settings. But, in the project tab there are two buttons that allow you to open the corresponding folders and perform the deletion / renaming of files using the standard Windows Explorer. Restart the plugin to update the lists if you changed anything in these folders.
List of stations for the imposition
WATCH VIDEO: Calculation of occupied places by circulation — auto imposition
There is a list at the top left of the main window of the plugin which contains stations to impose. The plugin works only with stations of the same size.

Stations can be added 1 in the list in three different ways:
- by picking all pages from a CorelDraw document
- by locating shapes marked as a border
By opening the side menu 2, you can perform additional operations on the list of stations — use currently selected shape as a border, add an empty placeholder, check and update the sizes of stations that are added to the list, completely clear the list.
Add pages from a document as stations
You can specify all document pages to be used in the imposition. To do this, click on the button — all pages from the active CorelDraw document will be added to the stations list. At the bottom of each item in the list there is a link with the name of the document from which the page was taken. It is possible to pick pages in a single project from different documents. The only limitations is that all pages should be the same size.
Add currently selected shape as a border
It is often convenient to specify the object that should serve as a clipping border simply by selecting it in the document. If anything is selected in the document, the Add selected border menu item will be active. The geometric dimensions of the selected object will be used for the station.
When calculating the layout, the plugin will place in it all the shapes that are inside or cross the specified border. The crop marks will be set according to the geometric dimensions of the selected object.
Add a marked border as a station
During the installation of the ReproScripts Imposition library an additional control is added into the CorelDraw interface. It allows to mark a rectangular shape as a trim border for the design within. The control ties additional information with the border shape which can be picked up by the Auto imposition plugin. All object within the border bounds will be considered a separate job and be added to the list of stations. During the imposition the plugin will process it alongside with other stations and place into the resulting file.
When calculating the layout, the plugin will place in it all the shapes that are inside or cross the specified border. The crop marks will be set according to the geometric dimensions of the selected object.

Why is this necessary? Not always the designer creating a new job sets the correct page size equal to the trim size of the job. In some cases, it is more convenient and more graphic for them to make several jobs on one page. Later, to make an imposition, the plugin needs to know where exactly on the page the design positioned. A rectangle marked as a trim border provides this information.
The control for marking borders is built into the standard toolbar of CorelDraw. Therefore, to use it, the standard panel must be enabled in the interface and be positioned horizontally. The element has an orange background, allowing you to quickly understand which object can be marked as a border.
Rectangles marked as a design border can be on different pages of the document — the plugin will find and use them in the layout. In addition to indicating that the object is a trim border, you can specify the number of the job, whether it is the front or the back side and the required circulation. All this information is optional, it is not necessary to fill it in every time. For details on how the plugin uses additional information for stations, see below.
In order to search the active document and add to the list of stations all objects marked as trim borders, you need to click the button in the list header.
Add a placeholder
The plugin performing imposition is guided by the station circulation and its number. This allows to automatically place the required number of copies of the design on the printing sheet. If, at the time of creating the imposition, you just need to reserve an empty space, which will then be used to manually place the job — you should click on the Add placeholder menu item. For the added placeholder, you must at least specify the dimensions and its number. When executing the layout, the plugin will take into account such placeholders on a par with other stations, but, of course, the work will not be inserted into them.
Stations details
-
To perform the imposition, the plugin needs for each station of the list following data:
- size - must match for all stations
- side face and back sides are imposed on separate sheets and aligned
- number of job - required for correct alignment of the front and back side in the layout
- circulation - allows to calculate the quantity of places taken by each jobs on the printing sheet
In the case of simple layouts, when it is not necessary to align face/back sides of the job, or for example, when only one station is laid out, then it is not necessary to specify all the data. More detailed information is required for the correct calculation of complex impositions. If you impose several sets of business cards for printing, then by specifying the print runs and the sides you get a full layout with the optimal filling of the places on the printed sheet in one click.
Station details can be filled using the border marking control during the design time and when loaded into the plugin. Or, you can do it at the last minute when setting up the imposition parameters.
-
Other commands in the stations list
- clear the list completely
- find the border or page in the document
- delete station from list
- A click on the link with the document name opens the folder containing it
List of colors
In the group of elements added to the layout there is a list of paints. If the flag for adding the name of paints to the layout is active, then it must be filled with paints from the list of stations. After you have added one or more stations to the layout, click the button. The list of colors is used by the plugin to add their name to the layout, as well as when forming the color scale.

After you have added one or more stations for the layout, click the button. The plugin will scan and add all the colors that are present in them. Only colors of models CMYK , Gray and Pantone are added. If the plugin detects the presence of other color models, all CMYK components will be added. The list can be adjusted manually — add, delete or change the name of the colors.
Imposition options

The most important information for the plugin, except for the list of stations, is the indication of the printing machine and the paper used. As was mentioned above in the description of the parameters of a printing press, this data is used to accurately determine the maximum dimensions of the layout and its positioning on the sheet.
Below the list of the press there is a checkbox respect the margins of paper that allows to specify whether it is necessary to use in this particular layout non-printable paper margins specified in the press settings. Sometimes it is possible to create a more optimal layout by disabling the margins. At the same time, the operator should understand that the layout will be slightly larger than can be printed and some elements may not fit. Therefore, it will be necessary to check the result and make a decision. For example, if printing marks are not printed by 30-40% this should not affect the printing process too much, but can significantly reduce paper waste.
Bleed

The plugin allows you to add bleed around the stations during layout in two ways.
The first option allows you to set the exact value of the bleed for each of the four sides of the design. This is required in special cases and allows the operator to flexibly control the result of the plug-in. If one size is required, you can block separate editing of values with the lock button.

The second option allows you to specify the internal and external bleed between designs in the finished layout. This method avoids adding up the left and right (or top and bottom) bleed values of adjacent designs and is often more convenient and allows for tighter placement of jobs on the printed sheet.

Orientation
When calculating imposition, the plugin automatically selects the most optimal orientation of jobs on the sheet to achieve the selected layout strategy. However, sometimes it is required that the work has a strictly defined orientation in the layout. To do this, you can specify the necessary value in the list. The value Do not change implies the orientation is the same as in the source design.
At the bottom of the form, there is also an optional checkbox rotate by 180° for final rotation of the station by 180 degrees. The rotation is added in addition to the orientation calculated by the plugin. Such a turn is sometimes desirable on the basis of technological considerations for more convenient printing or subsequent finishing of the product.
These two parameters allow you to flexibly and quickly control how the jobs will be oriented on the printed sheet.

Back side rotation
When preparing the imposition for two-sided printing, you can specify the type of sheet flipping on the press
- Top-Top - horizontal sheet flipping. The upper edge of the front side of the printed sheet remains upper for the back side.
- Tob-Bottom - a vertical turn. The upper edge of the front side of the printed sheet becomes the bottom for the back side.
The rotation settings must be taken into account, since they affect the alignment of the front and back sides of the stations when performing the imposition.
Printing marks
Almost always in the layout should be additional technological marks, allowing to properly configure the printing and subsequent finishing processes. The plugin allows to easely manage a set of placed printing marks.
It is important to understand that the plugin calculates the imposition taking into account the fact that all the marks must fit into the printed area of the sheet. In the plugin settings on the tab Printing marks you can adjust all the sizes of the elements. Also, individually for each printing press, it is possible to customize these values.
Trim marks
Trim marks are are required almost always and allow to cut the finished product into the desired format. In the settings for the trim marks, you can specify their length, thickness and distance from the cutting edge.
Registration crosses
These marks allow the printer to precisely align the separations during printing. This is relevant for offset printing. For digital printing the crosses can be used to align the front and back sides of the printed sheet.
Color scale

A color scale is often required for offset printing. It makes it possible to evaluate the uniformity and density of the inks distribution over the entire area of the printed sheet. The plugin forms a scale from all CMYK and Pantone colors present in the project. The scale includes color patches, elements for gray balance and dot gain control.
Ink names
For offset printing on each separation, you need to specify the name of the ink it supposed to be printed with. The plugin adds inks names next to the other printing marks. For digital printing, this is not necessary.
Registration crosses in design area
The plugin allows to add registration crosses within the design borders, that is, in the printed area. This can sometimes be useful in offset printing, e.g. for printing envelopes in several spot colors. Since the trim size of the envelope design exactly coincides with its physical dimensions, then no marks, including registration crosses, fit and are not printed. This creates problems when aligning different ink separations on the press. The plugin places temporary crosses in the design at the specified distance (in the plugin settings) from the edge. That makes it possible for the printer to perform the registration and then remove the crosses from the printing plates before printing the actual run. Of course, this approach can not be used for all jobs, but sometimes it is quite convenient.
Guidelines
To control the resulting imposition file, the plugin can add guideliness into it in the positions of the horizontal and vertical trim marks and the centers of the crosses.
Additional text
The plugin automatically places text in the finished imposition which contains information on the working project, the estimated circulation of each imposition sheet, its number and the side. In addition, you can place any additional text in the layout.
Imposition strategies
WATCH VIDEO: Carbon copy forms and envelopes — auto imposition

In many cases, there is more than one way to distribute stations on printed sheets. All of them can be correct, but differ in some characteristics. The plugin allows to specify which strategy to adhere to when calculating the layout and placing the stations on their position in the printed sheet.
Imposition strategies will only make sense if the circulations for all stations are correctly set. Otherwise, from the plugin point of view, all stations should be placed the same number of times and it will not be possible to achieve savings in plates or paper.
Do not place jobs
The simplest strategy is not to put the jobs into the imposition at all. The plugin will generate an output sheet with the necessary marks for the size of the station, but will not insert any designs into their position.
Minimize paper waste
With this strategy, the plugin, if it has different routes available, will try to choose the one with which there will be minimal paper consumption. That is, there will be as few unused places on the plate as possible and there will be a minimum overan in circulation. This strategy is most suitable for printing without the use of plates, for example, for digital printing.
Minimize press plates
If plates are used on the press, then perhaps a small overrun of paper will be economically more profitable than the additional plates that may be required for printed sheets. The plugin for this strategy will try to fit as many stations as possible on the same plate, not paying attention to the resulting over-run in circulation.
One job per sheet
This strategy is suitable for printing carbonless forms, because each layer uses its own type of paper and can not be combined on one plate. For example, a station for the top layer and a station for the lower one can not be placed on the same plate. The plugin will calculate the optimal layout of each station on a printed sheet and prepare an individual output sheet for each of them.
One job without layout
This strategy is suitable mainly for envelopes. The plugin will simply place the station on the printed sheet, add all the required marks and, if necessary, position the layout on the printed plate according to the settings of the printing press. For a couple of clicks you will get a ready imposition file for CTP.
Imposing
To perform the imposition, click the button. It will be active if the plugin has enough information to start working. If there is a problem with the parameters of the project an error message will be displayed in the status line at the bottom of the form or in the list of stations.
The plugin can issue a warning on an orange background about an insufficiently optimal layout. The warning does not prevent you from trying to impose — the start button is active. The operator should decide on the need for such a step.
The imposition process includes a lot of steps. If an error occurs on any of them, it will be added to the log. Having finished its work the plugin will report that there were problems. To view the log and find out what happened, click on the button with an exclamation mark in the status bar.
Finished imposition in CorelDraw files
After completing the imposition, the final CorelDraw file is saved to the folder next to the source document. A separate subfolder is created with the name based on the project title. This allows to easily navigate in imposition results and return to them at any time.
You can open the folder with the result from the project manager by clicking on the button . This way you can instantly find the right document without having to navigate through a complex folder hierarchy.