ReproScripts Calendars Annual calendar plugin for CorelDraw
- calendar for 12, 9, 6, 3 or 1 months
- flexible control over the arrangement of blocks, direction of days
- easily change the sizes, colors, fonts throughout the design
- scalable preview
- lists holidays and important dates with changed appearance
- online service to download holidays for 47 countries
- support for various languages (38 installed + your own)
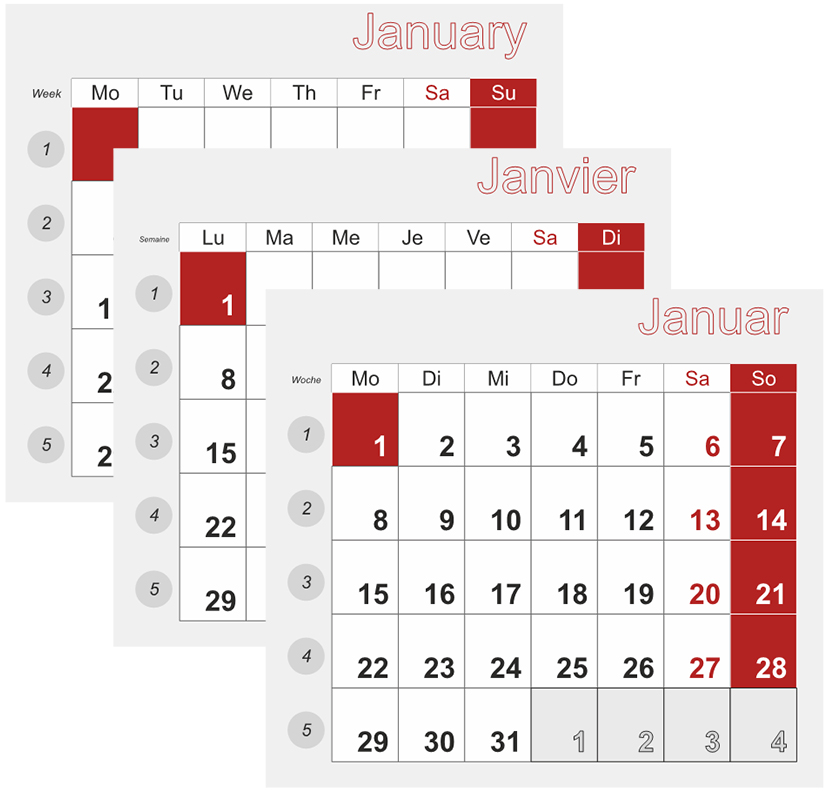
Annual calendar is a plugin from ReproScripts Calendars library. It allows to easely configure and generate a scalable and modifiable calendar for a whole year or several months. Flexible parameters control the appearance of all elements. Annual calendar supports a list of colors and fonts, common for all elements, which makes it easy to change them throughout the design in one step. Dimensions can be specified in both millimeters and percentages relative to the parent element. This makes it easy to change the size of the calendar even without preserving the proportions.
Once you have set up a calendar project, you can launch it and create a CorelDraw file with a calendar for any year and in any supported language in a matter of seconds. This makes this plugin an important tool in the work of a professional designer, eliminating routine work and significantly saving time.
Projects

Many of the ReproScripts plugins use projects to organize their work. Each project contains complete information for them to carry out the required task. Annual calendar keeps in projects the complete information on all calendar elements.
There is a project manager control at the top of the plugin's window. To create a new project, click the button and give it a name. As a name, we recommend using the job order number. This will allow you to easily navigate in the list. If you make any changes to the project, you must save it by clicking on the button with a floppy disk .
A detailed description of all the features of the project manager and its settings can be found on the this page.
General layout of the calendar
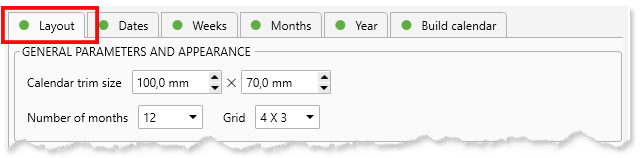
With every new project a calendar is generated based on the master project used or the default settings. In the first tab Layout you can specify the parameters that affect all elements and the general view of the calendar.
First of all, you can specify the calendar trim size of the calendar within which all months blocks will be placed. You also need to select the number of months in the calendar (12, 9, 6, 3 or 1) and their relative location.
Scalable preview
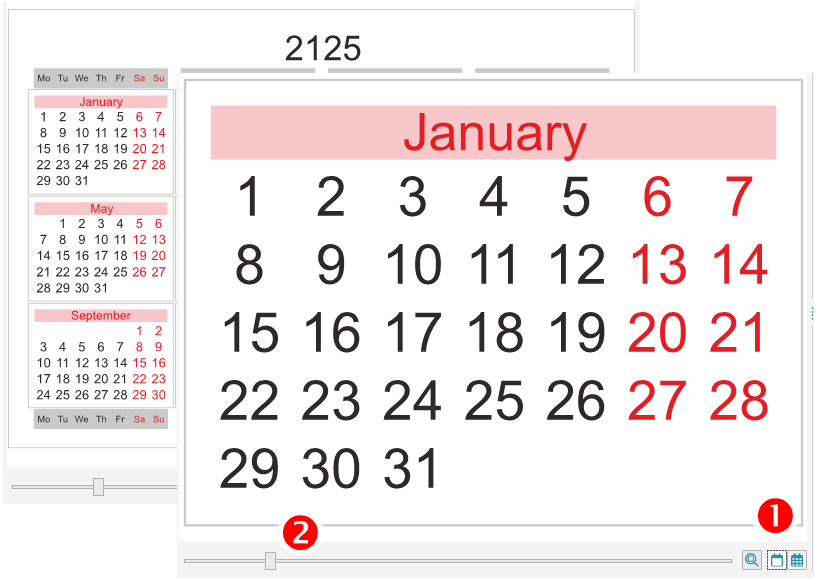
The preview window is located in the left part of the plugin form. In it, based on the project data, an image is formed as close as possible to what will eventually end up in the CorelDraw file.
Using the buttons located at the bottom right 1, you can switch the display type — month or year and fit the calendar to the size of the viewing window. This is useful for fine-tuning the appearance of days and other elements in months.
The slider at the bottom 2 of the window allows you to zoom in and take a closer look at the right part of the project. To reset the slider to its original position, double-click anywhere in the viewport.
List of colors and fonts
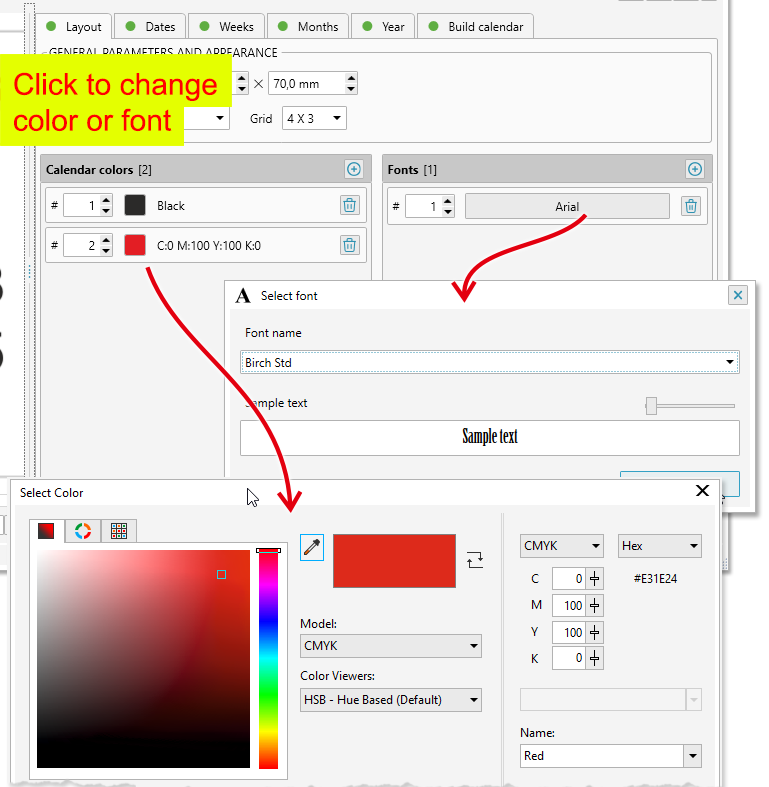
In the Layout tab there are two lists — fonts and colors. All parts of the calendar use colors and fonts from these lists. This approach makes it easy to replace the color or font throughout the calendar, without having to edit all the elements individually. And there can be a lot of them.
Colors and fonts in the lists have a number and it is from this number that the elements of the calendar understand what color they need. In the header of the list there is a button , allowing to add a new record.
To change the color in the list - click on the button with the sample and in the standard CorelDraw color dialog box choose what you need. The plugin does not impose any restrictions on either the color or the color model used. You can change the number assigned to the color, but you want all the color numbers used in the project to be present in the list, otherwise the element will become transparent.
The font list works similar to the list of colors. To edit an entry, click on the button with the font name and select the one you need from the dropdown list. In the font selection window, there is a sample that shows the appearance of each font. Since the plugin uses standard Windows features to work with fonts, it is not possible for all of them to generate a preview. Windows supports displaying TTF and limited OTF fonts. Other types of fonts that are installed can be selected in the list, but they will not be displayed correctly either in the font selection window or in the preview window of the entire calendar. However, when creating a CDR file, the specified font will be used from the project and CorelDraw will display it correctly with its own means.
Managing the appearance of elements
In the plugin window there is a set of controls for each element of the calendar. They allow to set up specific values which influence the process of its building. There is at least one of the buttons or for every element which opens a dialog where the element's appearance can be adjusted.
The plugin considers that any element of the calendar consists of a background frame and text that is positioned inside this frame. Not all elements can have text, they only have a frame.
allows to edit the parameters of elements without text - just the frame - indents, lines, colors, etc. edits both the parameters of the frame and the parameters of the text that is placed in it - font, alignment, text color.
For example, the general frame around the entire calendar has no text inside, but you can set the background, line, etc. Therefore, in the Layout tab there is a frame editing button.
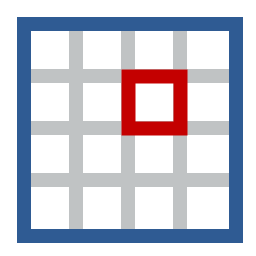
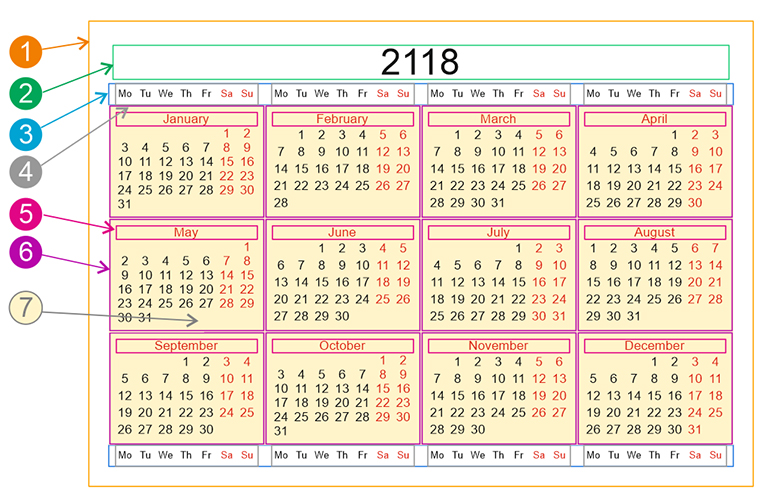
Calendar structure
The calendar is built from nested blocks, which has their own parameters to control appearance. The position of the block is calculated relative to the parent in which it is located. The diagram shows the calendar blocks processed by the plugin.
| Diagram | Elements |
|---|---|
|
Elements of the year block
|

|
Elements of the month block
|
Frame and text options
Buttons or open the dialog window which controls frame and text parameters of the calendar element.
Frame indents
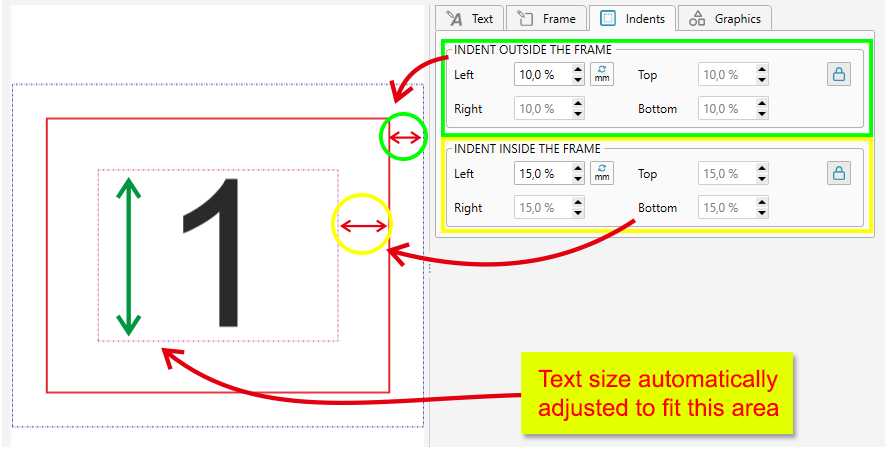
They can be set either in absolute units (mm / inches) or as a percentage of the dimensions of the frame itself. The percentage is measured from the length of the minimum side of the frame. This allows to easily scale the calendar keeping its appearance without the need for manual adjustments of all elements.
Text in the frame
In the tab Text you can specify the fill color, thickness and outline color for the text placed inside the element's frame.
The font size can be specified in points, but it is better to leave the activated by default automatic recalculation. The plugin, based on the size of the element, will estimate the optimal font size value, so that the text is completely within the boundaries of the inner margin of the frame.
To control the text appearance in the element, it is better to adjust the indentations which change margins rather than setting a fixed font size value in points. This will preserve the flexibility and scalability of the project.
Additionally it is possible to set the text alignment in the frame horizontally and vertically, as well as extra scaling and shifting. All these options make it possible to achieve the desired look of text for all elements of the calendar.
Frame options
For the frame itself, you can specify the background and outline color, as well as its thickness, radius and shape of rounding corners.
The frame can also be scaled and shifted relative to its initial position. This does not affect the text - only on the background of the element.
Shapes in the frame

Additionally, you can add an arbitrary number of CorelDraw shapes to each element. The plugin allows to add lines, rectangles, ellipses, stars, polygons and text. For each shape, you can set the size relative to the parent frame. When the respect parent inner indents checkbox is activated, the inner indent of the frame will be taken into account otherwise - only the outer one.
The size of the shape is set in percent to the parent frame horizontally and vertically. Alignment allows you to specify on which side of the parent frame the given shape should be located.
Each shape is assigned a background color and outline parameters. The shapes's relative position can also be changed. The shape can be located behind the frame or behind the text or in front of the text. This is important, since it affects what is overlapped by what.
The possibility to add shapes give to the designer the widest opportunities to change the appearance of the calendar in the project. Together with the frame and text parameters it allows to form elements of any complexity.
Overeloading appearance
The plugin allows to flexibly manage the design of all its elements. However, for the calendar this is not enough, since the design of the same elements can be different depending on certain parameters. For example, dates can be black for all days, except for weekends and holidays, when they should be red.
As a solution for this task, the plugin projects use the overloading of the design parameters of the element depending on one or another criterion.
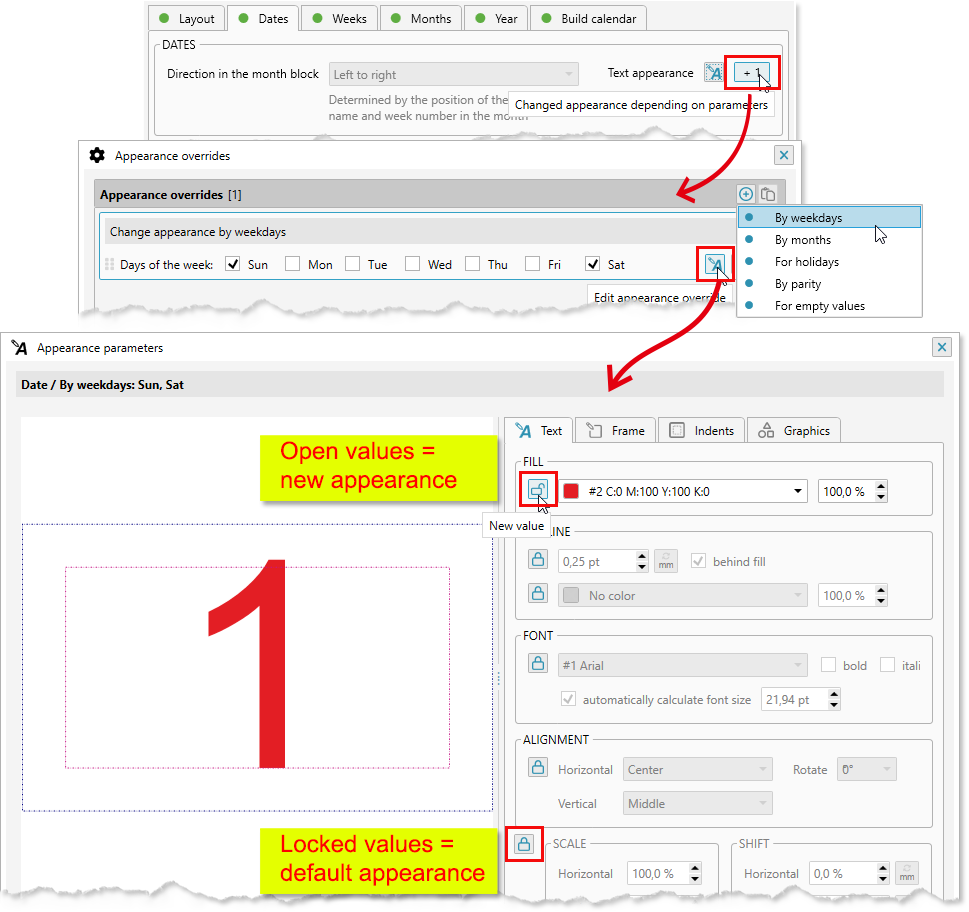
Next to the elements that support the overload there is an additional button with a digit indicating how many overloads are already in the list. If you click it a dialog window opens where you can specify when exactly the overloaded parameters should be used and what should be overloaded.
There is a list in the dialog window which contains all overloads for the element. The button in the list header allows to add a new one.
-
The following can serve as the reset criterion:
- day of the week: any combination of weekdays
- holiday: you must specify the list of the holiday that is used
- parity: whether the value of the element is even or odd
- month: arbitrary combination of months
- empty: allows to change the appearance for elements with empty or non-empty values
When adding (or editing) a criterion, a window for setting parameters opens. By default, all parameters are closed and they have a button. This means that this particular parameter should not be changed by the overload and its value remains the default one for the element. Clicking on the button changes it to which means that the parameter should be replaced with the new value.
For example, if you already have a basic date design, then to replace the color for the days off, it's enough to add one overload and change only one parameter &md the text color. All other parameters — font, frame, etc. will be taken from the default appearance settings of the element.
The number of overloads of the element is not limited. In order to determine which one to use, the plugin go through the entire list of them from top to bottom, replacing the overloaded parameters in the default appearance.
Holidays and special dates
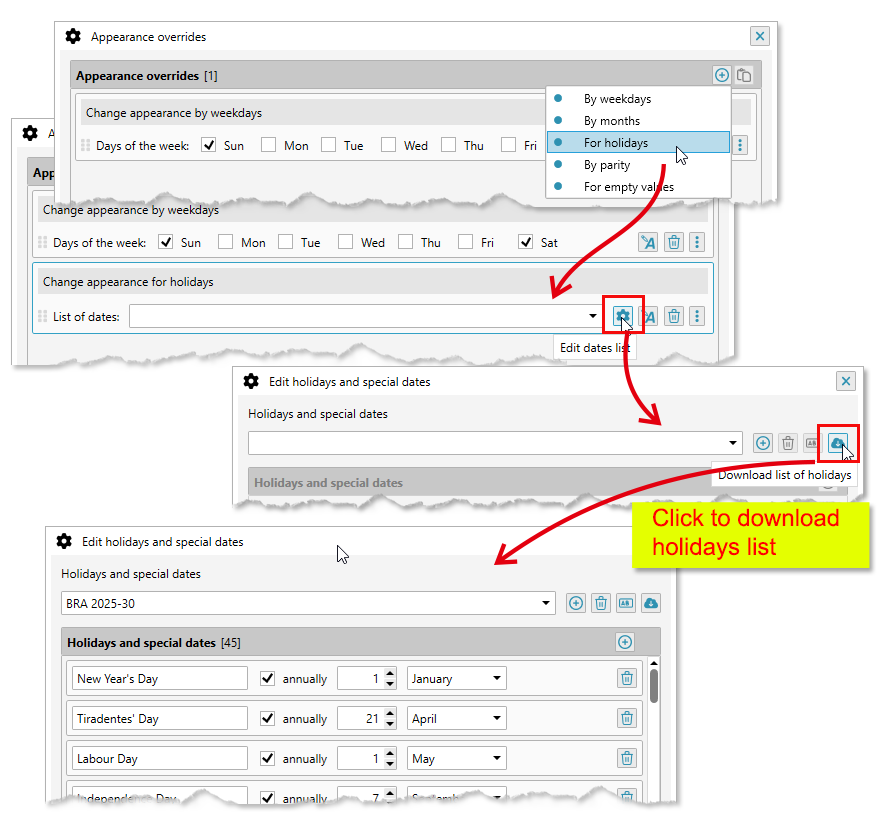
The plugin allows to maintain an arbitrary number of lists of holidays and other special dates. For each holidaylist you can customize the appearance of elements through their overloads - the color of text, background, etc.
You can manage the holiday lists in the plugin settings that open when you click the button with the gear in the lower right corner of the main window of the plugin. It is possible to do that as well in the list of overloads.
A list of holidays can be created manually by giving it a name and adding new dates with the button. For holidays repeated on the same date each year, it is necessary to tick off the annually checkbox. For floating holidays it is necessary to enter an exact date including the year. The name of the holiday is optional and is not currently used when creating calendars in the plugin.
ReproScripts also offer an online service for downloading holidays for 47 countries. To do that click on the button and select the country from the list. For some countries, you additionally need to specify the region, for example, for the United States — the state.
The list of holidays can be downloaded for 1-5 years starting from the specified year. The plugin will execute a request to the server and create a new list with a name based on the year and the name of the country. You can freely edit or rename the downloaded list later.
You can delete any list by clicking the button or rename with .
The list of holidays that you downloaded or created manually can be used in all plugins of the ReproScripts Calendars library to configure the overloads of the elements appearance. Thus, you can easily create calendars, in which you will automatically indicate holidays and any other important dates like corporate events, dates of birth, etc.
Calendar elements
After setting general parameters - trim size, colors and fonts lists, you can configure additional parameters for all elements of the calendar.
Dates
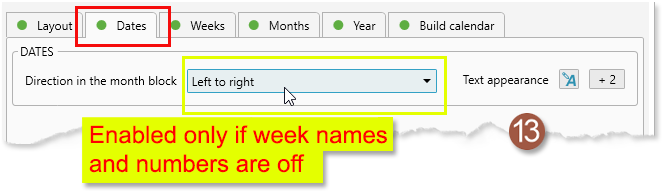
Almost in every calendar it is necessary to change appearance of days for weekends and, possibly, holidays. That means that some overloads should be added in the project in the Dates tab (13 in the calendar elements diagram above).
In addition overeloading an empty value will allow to change the appearance of cells in the month block in which there are no dates for the current month. By default, they remain empty, but on the Months tab, you can indicate for the incomplete weeks the need to fill them with the dates of the neighboring months. In this case, the empty overload will visually separate the dates of the current month from the dates of the neighbors.
For design purposes, you can use as well the parity overload of the date and the month to which they belong.
Dates in a month can run from left to right horizontally or from top to bottom vertically. This is determined by the position of the names of the weekdays in the tab Weeks. If the names of the weekdays are horizontal, then the dates will be horizontally located and vice versa. If for some reason the weeknames are disabled in the calendar, then in the days options you will be able to specify the flow direction manually.
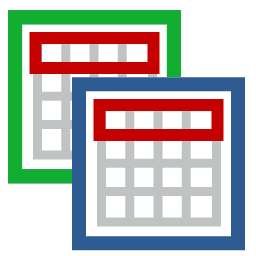
Weeks
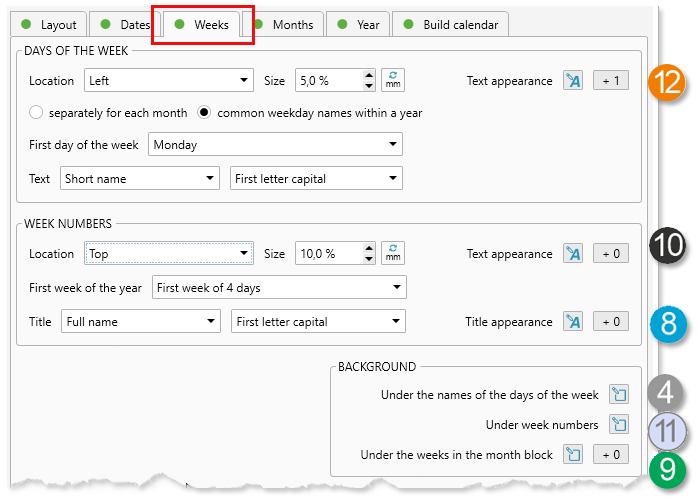
For weeks, you can specify the position of weekday names and the week numbers. These parameters affects the flow direction of the dates in the month blocks. The color bullets in the figure indicate which parts of the calendar from the diagram above can be managed by the buttons next to them.
The names of the days of the week can be formed for each month separately (with the active checkbox separately for each month) or they can be shared by all months of the calendar and be placed at the edges in its main frame. In this case the parameters of the frame under all weekdays names are additionally available for overloading. Frame parameters under days of weeks are always available.
The size of the weeknames element is considered as the width (if left-right) or the height at the top-bottom position. The value can be absolute in mm or inches or as a percentage of the parent element. If the weeks are located in the year frame of the calendar (the flag separately for each month is disabled), then the size is counted relative to the total annual frame, if the days of the weeks are for each month, then the block size for them is measured from the block size of the month.
The weekday name can be in the form of text — short or full, or in digital form. For the text of the weekday names, you can add overloads most often for weekends, since they allow to highlight the names by color.
-
Thus, for weekday names, you can configure:
- text and background colors (+ overloads) of each day of the week 12
- the background under the whole block with all names 4
- the background under the week line (+ overloads), you can, for example, apply different color for even and odd weeks 9
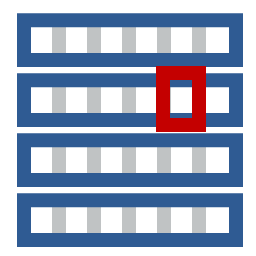
Week numbers
The numbers of the weeks are always put in months in the direction opposite to the direction of the weekday names. If the direction in the parameters is incorrect — the plugin will provide an error about the inability to generate a calendar.
There are several different approaches to what week in the year to consider first — a week with the first of January, a week in which there are not less than 4 days or a week in which there are all 7 days. The plugin allows to specify the required rule for the project.
For convenience and increasing the level of automation when creating calendars on the intersection on weekday names and week numbers you can add the word "week" as a title and an explanation what the numbers mean.
-
For week numbers, you can customize the appearance:
- text — background and font settings + overloads 10
- background under all week numbers in a month block 11
- background + text + overloads for the title 8
Months
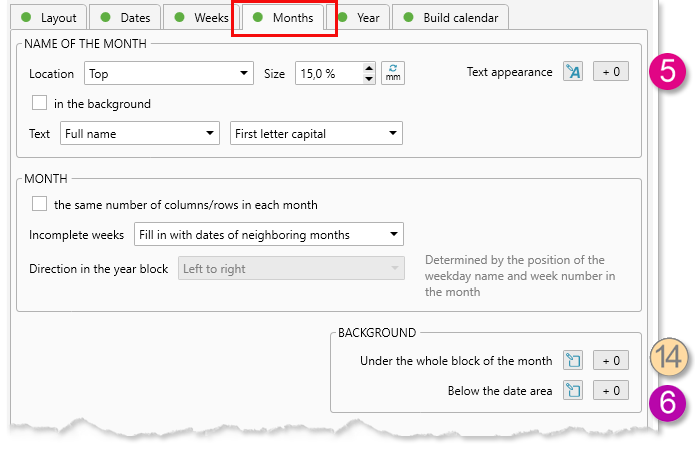
The Months tab of the main window of the plugin allows to set the relative position of different elements in the month block and specify the parameters the name of the month. The color bullets in the figure indicate which parts of the calendar from the diagram above can be managed by the buttons next to them.
The name of the month can be located on either side of the block of the month. The size of the element with the name (width, if it's left to the right, height, if it's bottom-top) is given in percent calculated from the month block size. You can also set it in an absolute value in millimeters or inches.
With the active in the background checkbox, the month name can also be positioned in the background of the month and will not take up any space.
For the name of the month, you can customize the appearance of the text and the background under it, plus overloads of the design, depending on the month.
The number of weeks in months is different. To achieve greater visual unity, you can activate the the same number of columns/rows ... checkbox. In this case, the plugin will complete, if necessary, with empty weeks, all months to one size.
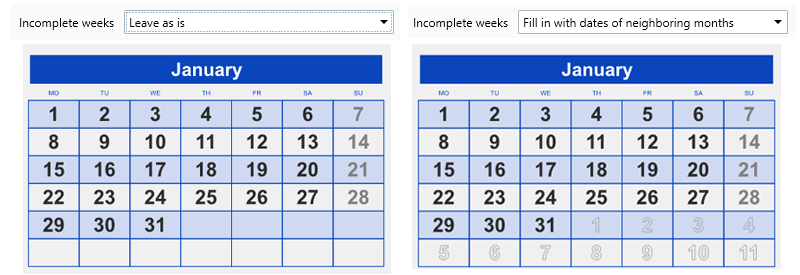
Additionally, it is possible to control the content of incomplete and empty weeks in a month. The standard value is to leave everything as is, that is, empty. Alternatively, you can fill empty cells with the dates of the neighboring months. To do this, you can select one of the options:
- fill in with neighboring dates: the plugin in all empty cells will place the dates from the neighboring months. To visually separate the dates of the current month and the dates of the neighboring months, we recommend that you use an overload for empty values. The plugin considers only the cells with the dates of the current month as filled, the cells with the dates of the neighboring month are regarded as "empty", which allows you to specify for them a different appearance
- combine with the neighboring months: the empty cells will be filled with the neighboring dates as in the first case, but in addition all the repeating weeks that may appear between the months will be deleted. This will result in a "united" calendar for the entire period without empty cells and repeats. You can use overloads by months to visually separate dates.
Background for months
To enhance the visual design capabilities of the calendar, the plugin allows you to set backgrounds for different zones associated with the month:
- the background under the whole block of the month (+ overloads) 6
- the background under all days (+ overloads), this zone does not include area under the month name, the week numbers and the weekday names 14
Year
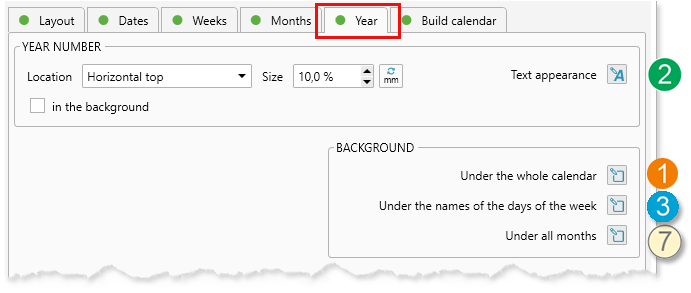
In the calendar main frame, you can add the year number. It can be located on either side or in the middle horizontally or vertically. The elemet size can be set in percent relative to the overall calendar dimensions or in fixed units in millimeters / inches. (2 in the calendar elements diagram above)
The year number can be placed in the background of the calendar. In this case, it will not occupy space, and it will be redistributed between other elements of the calendar.
In this tab you can change backgrounds for different elements:
- 1 main frame around the calendar
- if the weeks are common in the year — the general background under them in the frame of the year 3
- the background under all months in the frame of the year — it will allow to separate the months from the year number, weekday names 7
Building a calendar
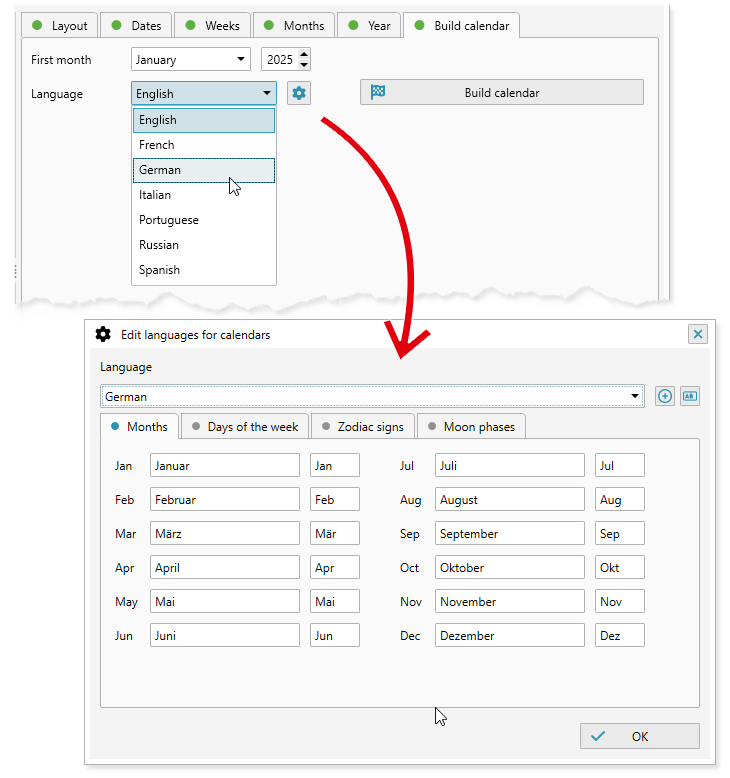
The last tab of the plugin window controls the parameters of the calendar generation. You must specify the month from which the calendar will start. This, of course, does not have to be January. The calendar will generate as many months as required in accordance with the selected calendar view in the Layout tab.
It is also necessary to select a language for all text elements of the calendar — the names of the months, days of the week, etc. With ReproScripts plugins 38 languages are installed, you can also add your own language if it is not present in the list.
By clicking on the button with the gear next to the dropdown list with languages, you can control them — make corrections to existing values, or add, delete or rename the language.
If you added a new language, you need to fill in the values on all tabs, including the names of the signs of the zodiac and phases of the moon. Astronomical information is not used in this plugin, but it is needed for another one from the ReproScripts Calendars library — Free layout calendar
If the project is configured, you can start it by clicking the button. The plugin will create a file in CorelDraw that corresponds to the entered data.
Export the project to another plugin
The ReproScripts Calendars library plugins work in close cooperation with each other. In the lower left corner of the Build tab there is a button that allows to convert the project and add it to the list of the Month builder plugin. These two plugins are much alike in the work and it is periodically required, having formed a project in one of them to transfer to another. This allows to extend the application of the created calendar designs without wasting time.