

ReproScripts VDP Variable data manager plugin for CorelDRAW
- various algorithms for generating variable data
- importing and inserting data from CSV/XLSX files
- variable 1D and 2D barcodes, including designer QR codes
- batch import and substitution of images from a folder
- automatic imposition on the printing sheet
- fast generation of print-ready PDF and PPML files
- delivery of finished files to digital press hot folders

The Variable data manager plugin provides a comprehensive set of tools for generating, processing, and inserting variable data into CorelDRAW documents. It can generate numbers and random identifiers using different algorithms, import rows and columns from CSV/XLSX files, select images from a folder, and process them in batches. The template can be any single-page or multi-page CorelDRAW document.
The result can be a print-ready PDF or PPML file, or a CorelDRAW document with individual data on each page when editable output is required. Direct PDF and PPML generation can process thousands or tens of thousands of records quickly while keeping output files compact.
PDF is the universal default format for new projects and can be sent directly to a wide range of printing devices. PPML is a specialized open standard for high-volume personalized printing and is a good alternative when it is supported by the target digital press or workflow.
Quick start
The plugin has many features, all described below. To understand the basic workflow, start with this short test run.
- Prepare a template: a CorelDRAW file containing at least one text object that you want to number.
-
Create a project by clicking the button in the project manager at the top of the window 1.
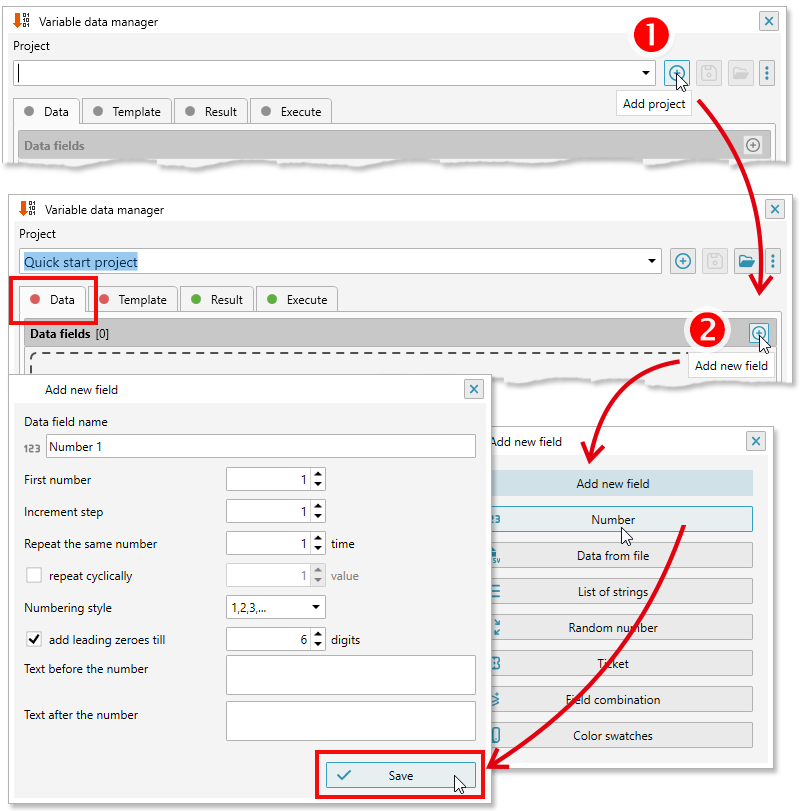
- On the Data tab, define how the variable number is generated: its initial value, increment, and other parameters. Click the button in the field list 2, select Number, and adjust the default settings if necessary. The new field is named Number 1.
-
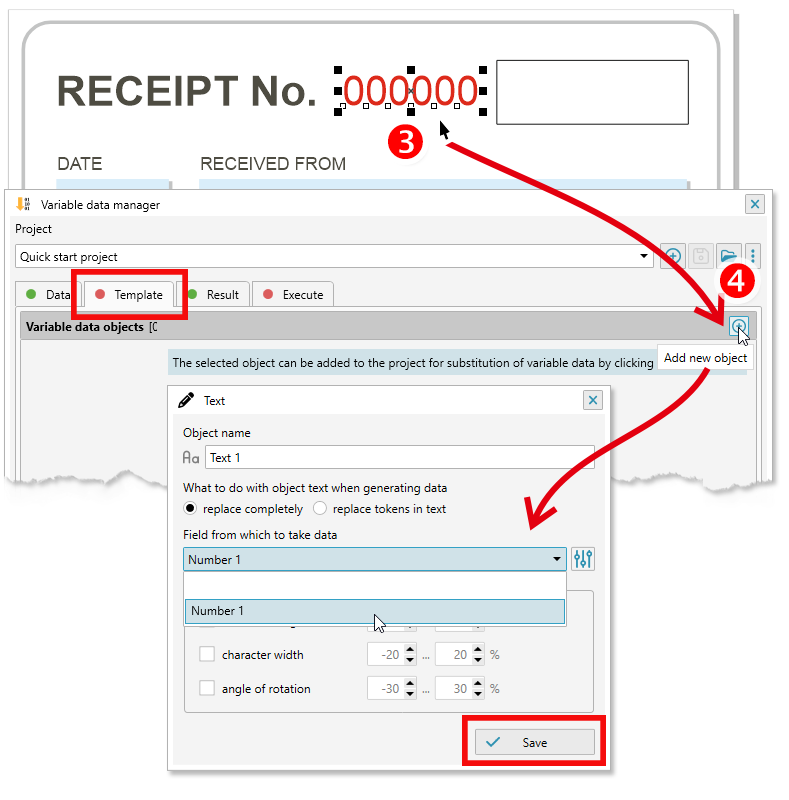
Bind the field to a template object. Open the Template tab and select the text object 3 in the CorelDRAW document. When a suitable object is selected, the button appears in the list header 4. Click it, select Number 1 as the data source, and click .
-
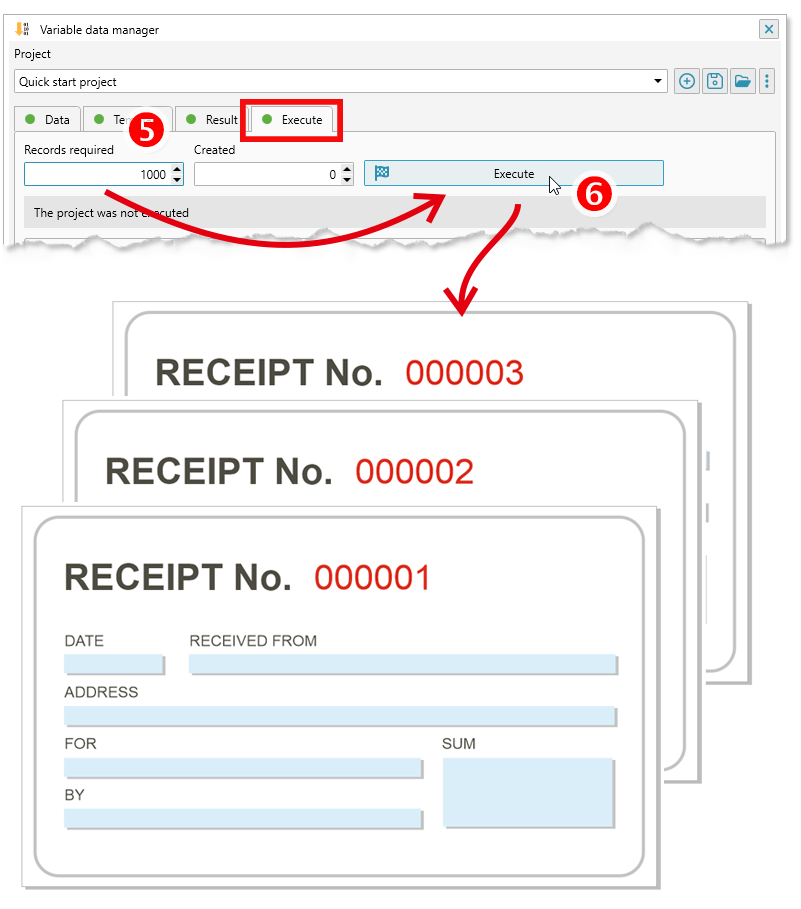
Keep the default settings on the Result tab. Open the Execute tab, specify the number of records 5, and click Execute 6.
The generated file will be based on the template and will contain a different value in the text object for each record.
 WATCH VIDEO: Variable numbers and barcodes in CorelDRAW
Project management
Many ReproScripts plugins use projects to organize their settings. A Variable data manager project stores the rules for generating and inserting variable data, references to the template and its objects, output settings, and other information required to run the job.
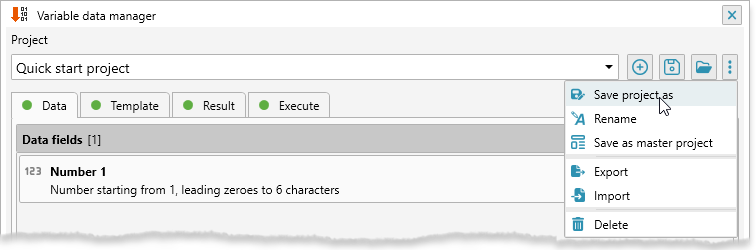
The project manager is located at the top of the plugin window. To create a project, click the button and enter a name. Using the job or order number makes projects easier to find later. After changing project settings, save them with the button.
Click the button to access additional project commands. The menu allows you to delete a project, save it under another name, export it to a selected folder, or import an external project into the list.
The plugin supports master projects, which act as reusable presets for new projects. A master project stores settings from the Data and Result tabs, reducing repetitive setup while allowing you to maintain any number of presets. Template-specific information, such as the CorelDRAW file and selected objects, is not copied.
-
For example, you can create:
- Preset 1 — a variable number repeated twice, imposed on an A3 sheet, with CDR output
- Preset 2 — a variable number without repetitions, imposed on an SRA3 sheet, with PPML output
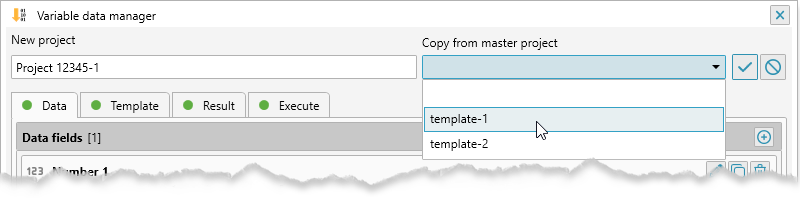
Any project can be saved as a master project by clicking the button.
Project manager settings
Open the plugin settings with the gear button in the lower-right corner, then select the last tab to configure the project manager. Here you can specify the project storage folder. By default, the plugin uses My Documents\ReproScripts\RSVDP. The ask for project names in a dialog window option controls how project names are entered. When enabled, a separate, more prominent dialog is opened for entering a name; when disabled, the name is entered inline directly in the project manager.
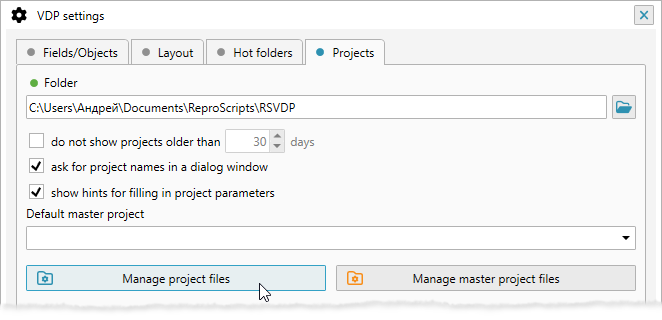
If the project list becomes too long, enable do not show projects older than and specify the maximum age of projects shown in the manager. Older projects remain on disk and can be made visible again by changing or disabling the filter.
You can also choose a default master project to be offered whenever a new project is created. A preset containing your most frequently used settings is usually the best choice.
Projects and master projects are stored as ordinary files using the names shown in the plugin. The settings tab provides buttons for opening their folders, where files can be renamed, moved, or deleted with Windows Explorer. Restart the plugin after changing these files externally so that the lists are refreshed.
Variable data fields
The first tab controls the variable data that will be inserted into CorelDRAW objects in the template. You can add any number of fields of different types. To create a field, click the button in the list header.
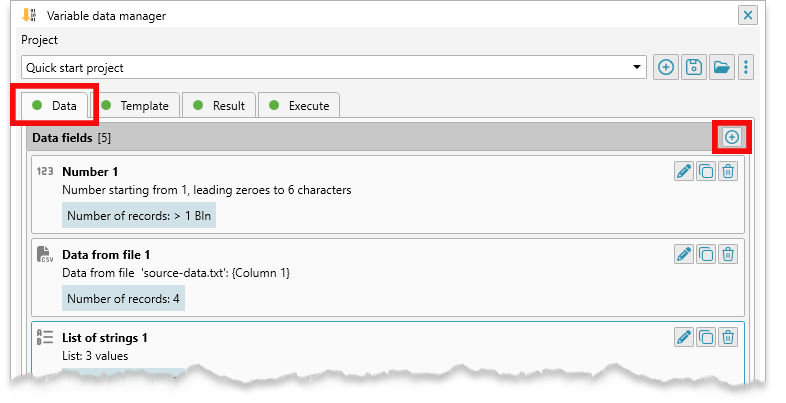
Editing the list of fields
Each field has three buttons on the right: delete it , duplicate it , or open its settings .
Use Shift+Click to select several fields. When multiple fields are selected, buttons appear in the header for copying them to the clipboard or deleting them together .
After fields have been copied, the paste button appears in the header. This makes it easy to transfer field configurations between projects.
Adding a new data field
Click and select a field type. A settings dialog specific to that type will open. Every field has a name used to identify it elsewhere in the project; replacing the default name with a descriptive one makes complex projects easier to manage.
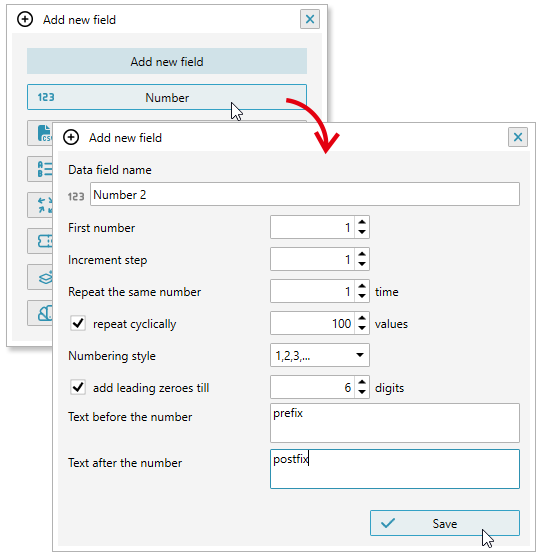
This field generates a sequence of changing numbers for insertion into template objects.
-
Number field parameters:
- First number: the initial value of the sequence
- Increment step: the amount added on each cycle. Use a positive value for an ascending sequence or a negative value for a descending sequence. A step of zero produces the same number on every cycle.
- Repeat the same number: the number of consecutive records that use each value
- repeat cyclically: limits the sequence to the specified number of values and then starts it again. For example, with a first number of 1 and an increment of 1, the normal sequence is 1, 2, 3, 4, 5, 6, 7, ...; with a cycle length of 3 it becomes 1, 2, 3, 1, 2, 3, 1, ...
- Numbering style: controls how calculated numbers are displayed. In addition to standard Arabic numerals (1, 2, 3, ...), values can be formatted as uppercase or lowercase Roman numerals (I, II, III, IV, ... or i, ii, iii, iv, ...) or as a sequence of uppercase or lowercase Latin letters (A, B, C, ... or a, b, c, ...).
- add leading zeros: pads Arabic numbers with leading zeros to the specified minimum length
- Text before/after the number: optional text added before or after the formatted value. Both the prefix and suffix can contain multiple lines.
WATCH VIDEO: Import and use variable data from CSV/XLSX files in CorelDRAW
The plugin can import data from CSV text files or Excel XLSX workbooks and insert it into template objects. A CSV file is a simple text file that can be exported from Excel or another spreadsheet application and can also be created manually. An XLSX file can be imported directly without first converting the workbook to CSV.
A CSV file consists of rows whose columns are separated by a delimiter, commonly a comma.
Example of a CSV file with three columns:
Column1-1, Column1-2, Column1-3
…
Values containing the delimiter can be enclosed in quotation marks:
"Column, 1-1","Column, 1-2","Column, 1-3"…
Where the plugin looks for the CSV/XLSX file
The plugin keeps project data close to the CorelDRAW template file. Before importing data files, assign a template to the project and save the template to disk.
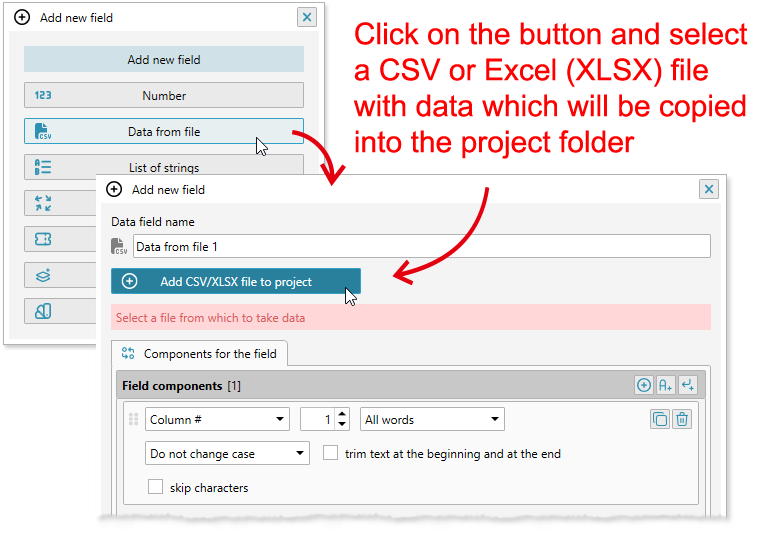
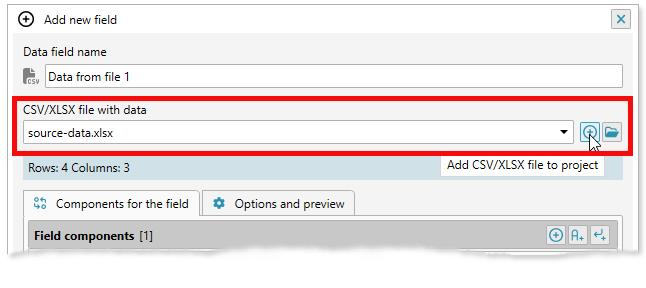
If the project does not yet contain a CSV/XLSX file, click the import button and select one from disk. The plugin creates a working folder next to the template and copies the file there. Use the button to import more files; each file field can then select the appropriate source.
Use the button to open the data folder in Windows Explorer. Files added or removed there are detected by the plugin and reflected in the field settings.
Managing the import of data from a CSV/XLSX file
For each CSV/XLSX file added to the project, you can set additional parameters that control its import. The options are available from the second tab of the field.
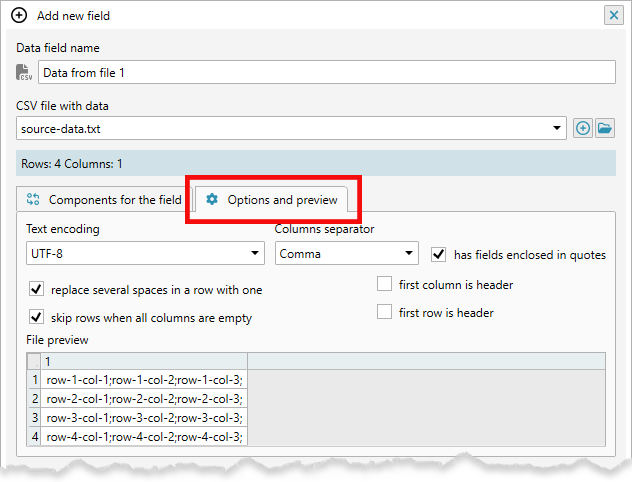
For XLSX workbooks, rows and columns are read directly from the spreadsheet. The following text-format options apply only to CSV files:
Text encoding — corrects unreadable characters when a CSV file uses an encoding other than UTF-8. Select the file's actual encoding, or resave it as UTF-8 before importing.
Column separation character — defines the delimiter used to split each CSV row into columns. The delimiter depends on the application and regional settings used to create the file; a comma is common, but any suitable character can be selected.
has fields enclosed in quotes — enables quoted CSV fields. Quotation marks allow a field to contain the delimiter itself, such as a comma inside a comma-separated value.
You can also ignore empty rows, collapse repeated spaces, and skip the first row or column when it contains headers.
The preview on this tab shows how the imported data has been divided into rows and columns, allowing you to adjust the settings immediately if the structure is interpreted incorrectly.
What the plugin takes from the CSV/XLSX file
On each generation cycle, the plugin reads the next row and builds the field value from its columns.
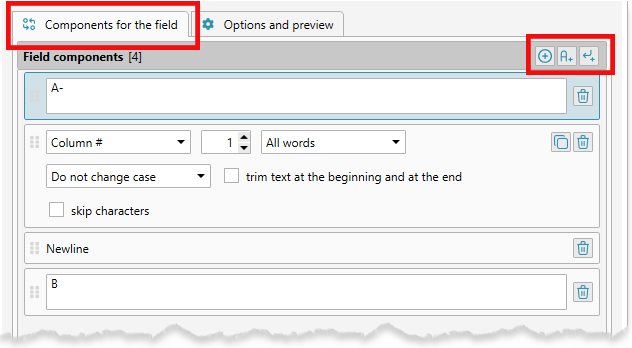
The component list specifies which columns are used, how their values are processed, and the order in which they are combined.
When a new file data field is created, the plugin automatically adds a component that imports the complete text from the first column. You can use this default component as-is, change the selected column or processing mode, or add other components to build a more complex value.
-
Use the buttons in the component-list header to add:
- the complete row or an individual column
- static text, including multiline text
- a line break
The plugin builds the value from top to bottom. Drag components by the handle to change their order.
Columns not referenced by the component list are ignored. If requested data is missing, the plugin inserts an empty value and records the problem in the generation log.
Repeating values
The settings below the list control repetition. Normally, each file row is used once. Enable repetition to use the same row for the specified number of consecutive records.
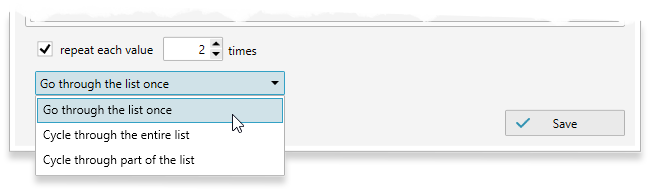
The drop-down list defines what happens after the available rows are exhausted. By default, the field returns an empty value.
Alternatively, the field can return to the beginning and repeat either the entire file or a limited number of rows.
For example, if there are 7 rows in the file, then without a cyclic repeat the plugin will take the rows 1, 2, 3, 4, 5, 6, 7, 'empty', 'empty', ...; if you specify the cyclic repetition of 3 rows, then the rows 1, 2, 3, 1, 2, 3, 1, ... will be processed.
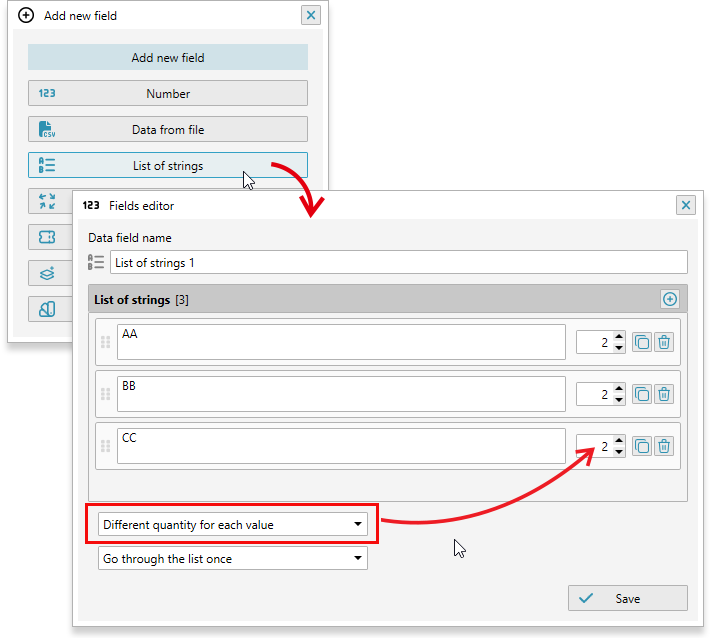
This field is convenient for short lists entered directly in the project. Larger lists are usually easier to import from a CSV/XLSX file.
Click the button to add a single- or multiline value. Drag items by the handle to change their order; values are processed sequentially from top to bottom.
Each value can be repeated several times. Repetition can be configured for the entire list or separately for individual items.
When all values and repetitions are exhausted, the field returns an empty value by default. It can instead restart from the beginning and repeat the whole list or a limited number of items cyclically.
Random identifiers are often used for coupons, access codes, tickets, and tracking values. This field can generate identifiers with a configurable structure while preserving them for reliable reprints.
Predictability
Although the values are random, the same project must reproduce them when a print run or part of it is generated again. The plugin therefore generates and stores the values for each field. They remain unchanged between runs unless the field settings are modified or the stored values are deleted.
The generated identifiers can also be exported with the other project fields to a CSV file for customer delivery, verification, or further processing.
The stored random-value file is kept in the project working folder. Deleting it forces the plugin to generate a new set of random values on the next run.
Randomness
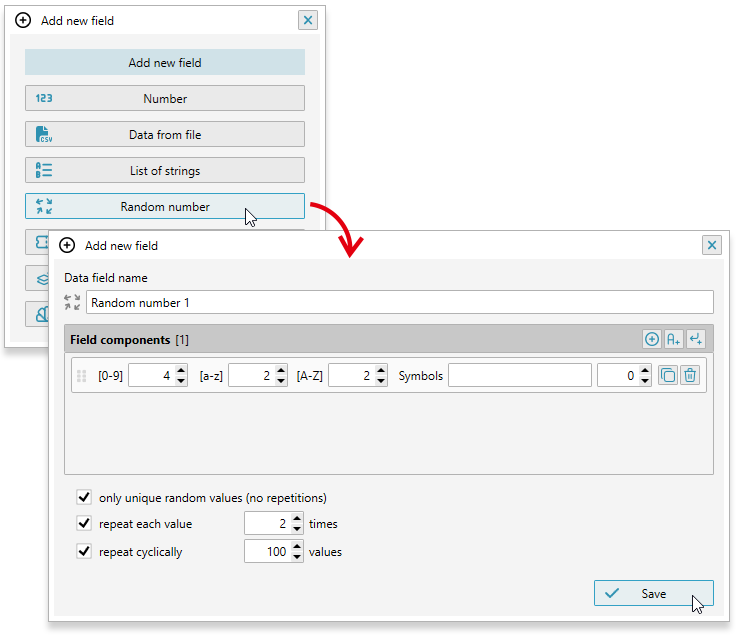
The component list in the field settings defines the identifier structure. A simple identifier may contain one random component with a selected character set and length. More complex identifiers can combine several random components, static text, and line breaks. Drag components by the handle to change their order.
The plugin processes the components from top to bottom and combines them into one value, allowing identifiers to contain arbitrary arrangements of digits, letters, symbols, and static text.
Enable only unique random values to prevent duplicates. If it is disabled, the same random value may occur more than once.
Repeating values
The repeat each value option specifies how many consecutive records use the same identifier. Cyclic repetition can also limit the field to a selected number of values and restart from the first when the end is reached.
Quantity of random values
The field list displays an estimate of how many unique values the selected structure can produce. This helps identify configurations that are too short for the required print run. If the plugin cannot generate another unique value, it reports the problem in the generation log.
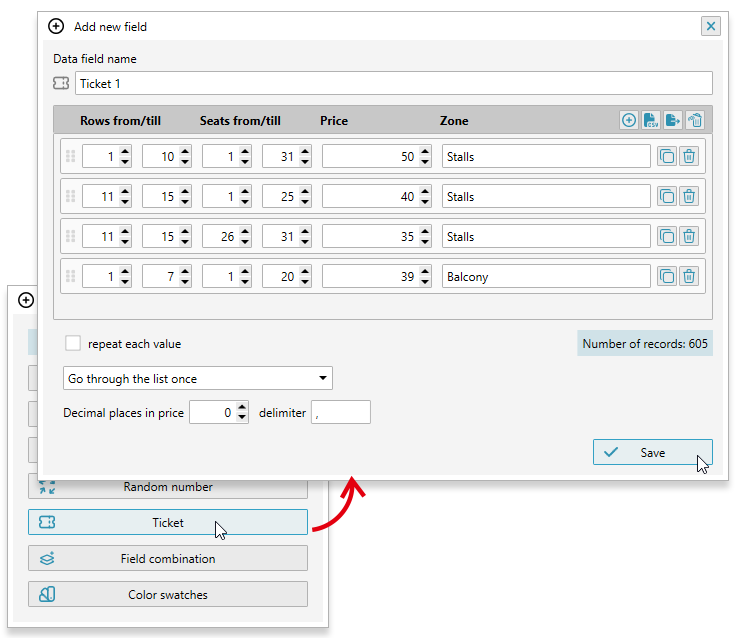
Event tickets often require structured numbering that cannot be represented by a simple numeric sequence. The ticket field models a seating plan using zones, rows, seats, and optional prices.
Add ranges to the list and specify the zone, row range, seat range, and price for each one.
The dialog displays the total number of generated seats. During generation, the plugin processes each seat in order and makes its zone, row, seat, and price available for insertion into the template.
A configured seating plan can be reused in other projects by copying the field.
Importing a seating plan
If the seating plan already exists in a spreadsheet, it can be imported instead of entered manually.
Click the button and select a supported data file containing the seating information.
Each imported row must provide the following information:
- zone: single column
- price: single column
-
row range: required and accepted in either of two forms:
a) separate columns for the first and last row
b) one column containing the first and last row separated by a hyphen -
seat range: required and accepted in either of two forms:
a) separate columns for the first and last seat
b) one column containing the first and last seat separated by a hyphen
Map the source columns in the import dialog. If a range contains only one row or seat, the same source column can be selected for both its beginning and end. The imported ranges are added to the table and then processed sequentially during generation.
Repeating values
Seat data can be repeated for several consecutive records. Cyclic repetition can also restart the seating plan after the last seat has been processed.
Price format
Ticket prices can be formatted with a selected number of decimal places and a custom decimal separator.
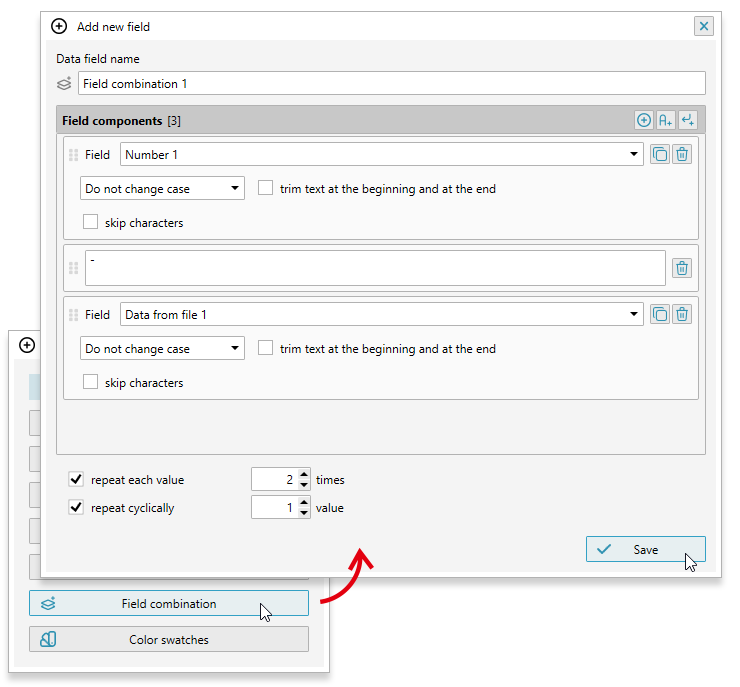
Use a combined field when one output value must be built from several existing fields.
The component list can contain previously defined fields, static text , and line breaks .
The plugin processes the components from top to bottom and joins them into one value for insertion into the template.
Drag components by the handle to reorder them, or click to duplicate a component.
Each value can be further processed — the text case can be changed, extra spaces can be removed, or only a certain range of characters can be taken from the field.
The resulting combined value can be repeated for several records, and the source sequence can restart from the beginning when it is exhausted.
WATCH VIDEO: Dynamic color substitution
when generating variable data in CorelDRAW
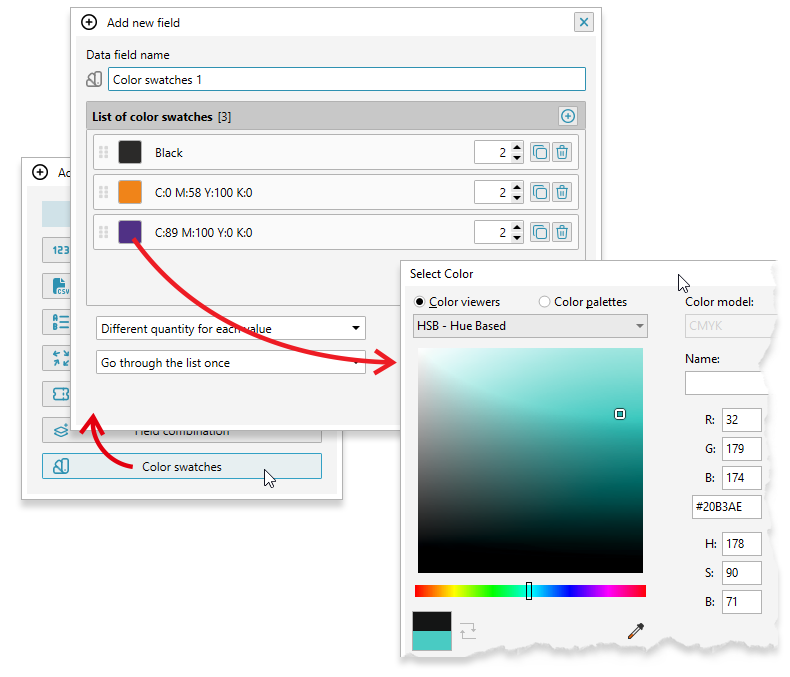
A color-swatches field provides a sequence of colors that can be assigned to the fill or outline of variable objects.
Click to add an item, then click its color swatch to open the standard CorelDRAW color dialog.
Drag colors by the handle to change the order in which they are processed.
Colors can be repeated globally or individually. You can also choose whether the field returns an empty value or starts again when the list is exhausted.
Template
The fields configured on the Data tab are inserted into a template, which can be any single-page or multi-page CorelDRAW file.
The following CorelDRAW object types can be used:
| CorelDRAW object type | Can be used for |
|---|---|
| Artistic or Paragraph text | variable text from any field, variable colors |
| Rectangles | variable barcodes or images from a folder, variable colors |
| Other shapes | variable images from a folder, variable colors |
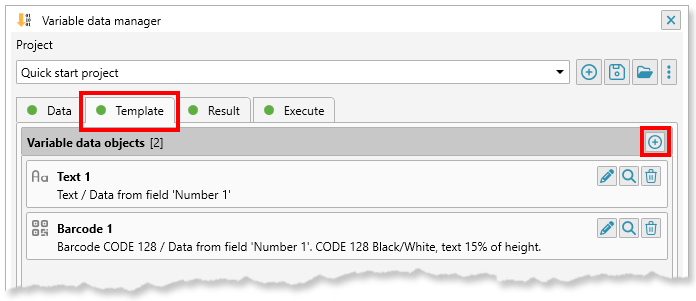
Template objects used for variable data must not be inside groups or PowerClips. Open the Template tab and select an object in the template document. If the selected object is supported, the button appears in the list header. Click it to bind a field to the object and configure how the variable value is inserted.
Variable text can be inserted into Artistic Text and Paragraph Text objects. Select a text object in the template and click . The plugin preserves its formatting, including font, size, alignment, and color. A name is generated automatically for the new project object and can be changed if necessary.
The key setting is the source field whose value will be inserted. Select it from the drop-down list. If the list is empty, create a data field first. An object without a valid source field is marked as an error and prevents generation until corrected.
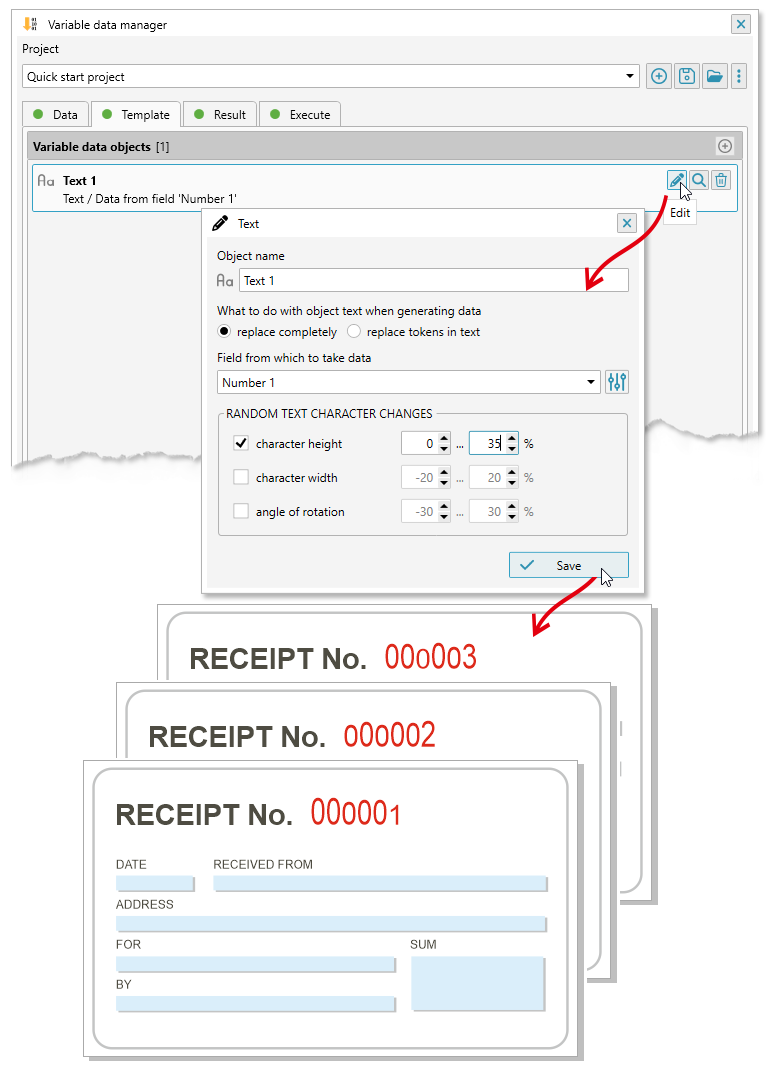
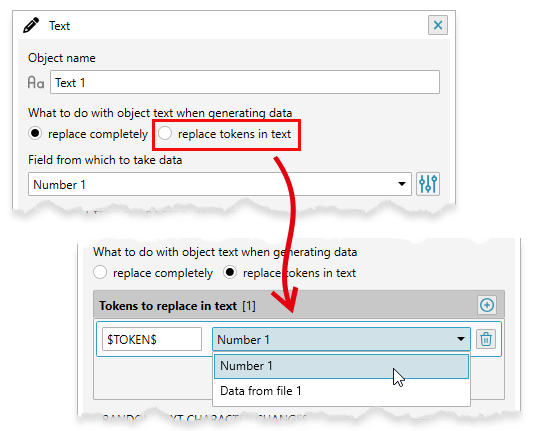
Selecting a text replacement method
For a text object, you can configure the method of replacing text when generating data. By default, the text initially present in the object will be completely replaced with a new value. If you select token replacement, you can add a list of text markers that will be found in the template text and replaced with the value of the specified field. Token replacement is useful for single- and multiline text because it changes only the marked values and leaves the surrounding text unchanged.
For example, a text object can contain the tokens $CUSTOMER$ and $CODE$. In the object settings, assign a project field to each token, such as a list of names and a random identifier.
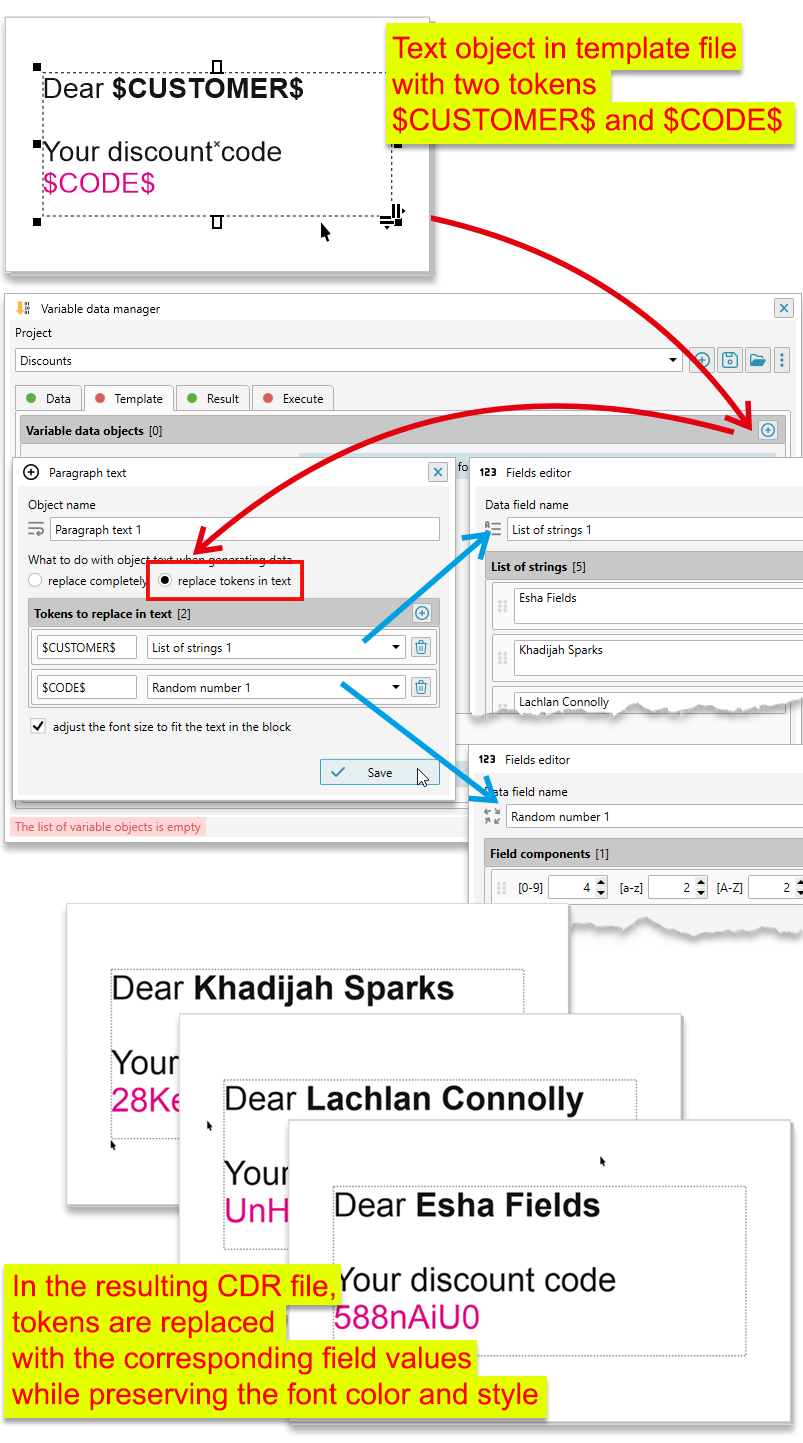 WATCH VIDEO: Two modes of inserting variable data into text objects
During the data generation process, the plugin will replace the tokens with the required data, while preserving the text formatting — colors, fonts, etc. Working with tokens is available for both paragraph and artistic text, including multi-line text and linked frames.
Additional text value processing when replacing text completely
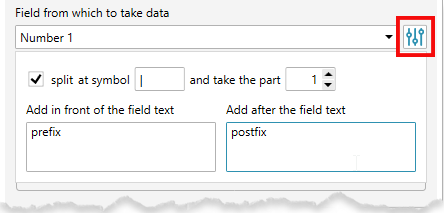
Full replacement mode provides additional value-processing options through the button. For example, the value can be split by a selected delimiter and only one part inserted.
Text can also be added before or after the field value at the object level. This is useful when several objects use the same source field but require different prefixes or suffixes.
Dynamically changing the outline and fill colors
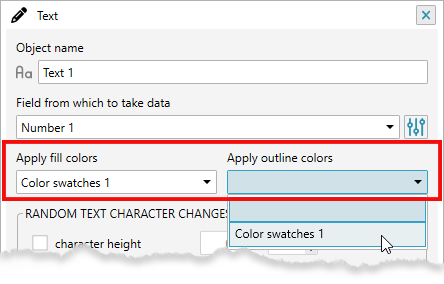
If the project contains a color-swatches field, assign it to the text fill or outline. The object's color will then change together with its text value during generation.
Options for Artistic text
Artistic Text can apply deterministic random variations to the height, width, and rotation of individual characters. The variations are derived from the field value, so the same value receives the same appearance when the job is generated again.
Options for Paragraph text
Paragraph Text can automatically reduce the font size when substituted text does not fit within the frame.
Linked paragraph-text frames are supported, including chains that span several template pages. When fitting text, the plugin considers the combined capacity of the linked frames.
The plugin can add variable barcodes to the template. Draw a rectangle at the required position and size, select it in the CorelDRAW document, and click the button that appears in the object-list header.
The rectangle acts as the barcode container: its size, position, and rotation are used, while its fill and outline do not define the barcode appearance. Select a source field and optionally add text before or after the generated value.
Each barcode symbology has its own restrictions on characters, value length, and structure. The selected field must produce valid data for every record; otherwise, the plugin reports an error and cannot generate that barcode.

For every barcode type, you can set the foreground and background colors and rotate the code within its container. The container's own rotation is applied in addition to the rotation selected in the barcode settings.
-
For barcodes that support human-readable text, the available settings can include:
- font family
- font size as a percentage of the barcode height
- text stretching or centered alignment
- vertical text position relative to the barcode
Additional settings depend on the selected symbology. See the ReproScripts Barcodes plugin page for the complete list of supported barcode types.
QR code design
WATCH VIDEO: Variable designer QR codes with logos in CorelDRAW
For QR codes, you can select a design style and inspect it in the preview. Several standard styles are included, and custom styles can be created with the RS Barcodes plugin.
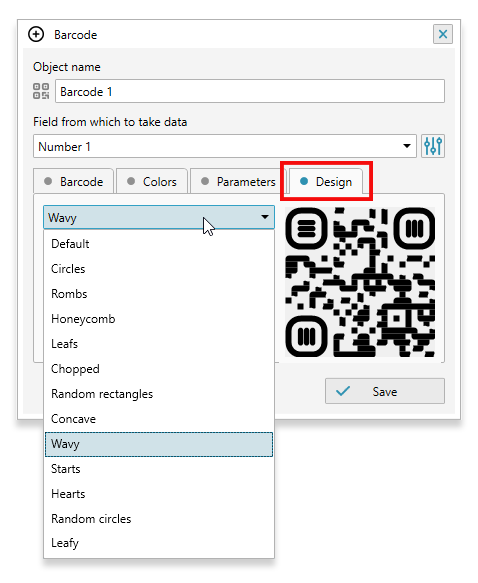
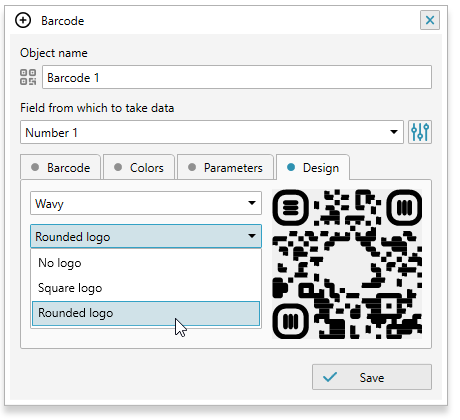
Logo placeholder in a QR code
An optional central placeholder reserves space for a logo or another image. The plugin calculates a safe area while preserving QR readability. Place the logo in the corresponding position in the template and use a transparent barcode background so that it remains visible.
The Variable data manager plugin can import and substitute images from a folder in batches. To add a variable image, select a rectangle, ellipse, or another vector object to use as its container. The button appears in the object-list header and opens the image settings.
Import the required images into the project with the file-selection button. They are copied to the project folder next to the template.
A source field determines which image is used for each record. Its value is compared with file names in the Images subfolder. The value may match the complete file name or occur anywhere within it.
Partial matching allows descriptive file names but can introduce ambiguity. For example, the value 1 also matches Image 12 and Picture 101. A prefix and suffix can make identifiers unambiguous: the value [1] will not match Image [12] or Picture [101].
The supported image extensions are configured in the plugin settings, opened with the gear button . By default, the plugin searches for jpg, jpeg, png, bmp, tif, and tiff files.
When a matching file is found, it is imported into the selected CorelDRAW container. Enable use the shape as a clip for the image on the Clip tab to place the image in a PowerClip, for example inside a circular frame.
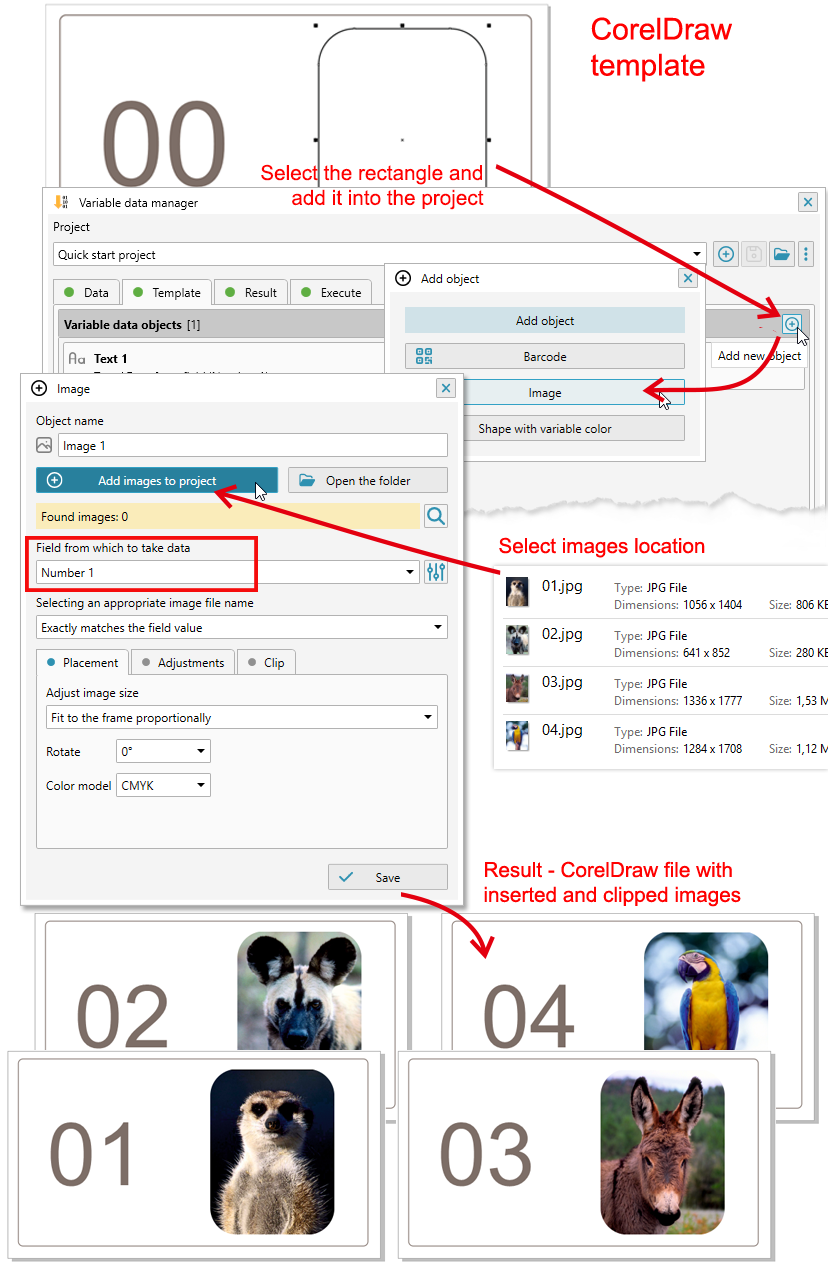
Source images do not need to be resized in advance. Choose how each imported image is fitted to its container:
- Do not resize: keep the original size and center the image in the container
- Fit to the frame proportionally: fit the entire image inside the container while preserving its aspect ratio; empty space may remain
- Fill the frame proportionally: fill the container while preserving the aspect ratio; parts of the image may extend beyond the container and be clipped
- Fill the frame non-proportionally: stretch the image to the container dimensions
The rotation setting is applied before fitting, which is useful when all source images have the wrong orientation.
Before placement, the plugin can adjust brightness, contrast, and saturation, and reduce excessive effective resolution to 300 dpi. CorelDRAW applies these adjustments to RGB images, so conversion to RGB may be required during processing.
You can also select the final image color model: RGB, CMYK, or Grayscale.
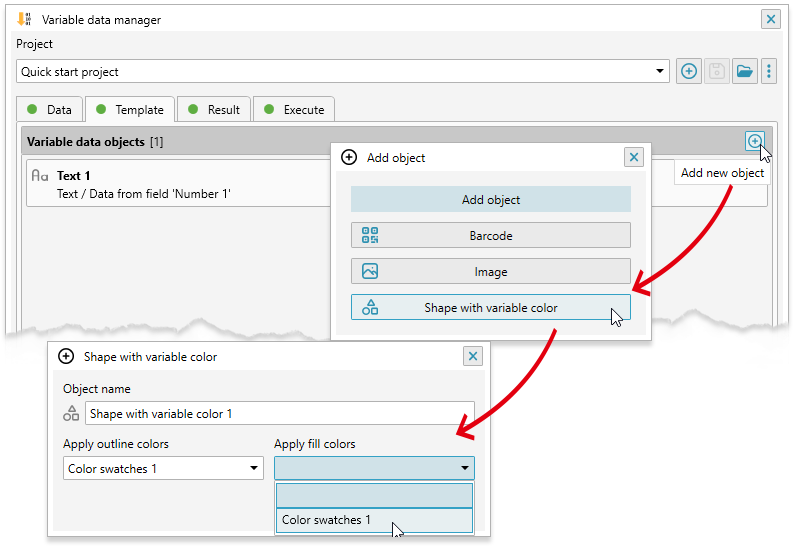
If the project contains a color-swatches field, it can control the fill or outline of a vector object. This can be used, for example, to change the background color for each record.
The CorelDRAW template file
The template-file control is shown below the object list. When an object is added to the project, its source document is assigned as the template automatically. To assign the active document manually, choose Use current document.
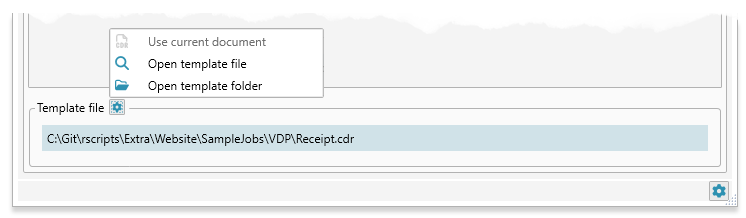
Project objects are linked to unique identifiers in the template file. Replacing the template with an unrelated document can therefore break these references. A copy of the original template, however, retains the identifiers and can be reassigned to the existing project.
Choose Open template file to locate and open the template in CorelDRAW, or Open template folder to show its location in Windows Explorer.
Result
The Result tab controls the generated file. Its base name is derived from the project name, and it is saved in the project working folder next to the CorelDRAW template. Running the same range again can overwrite an existing file with the same name. Add a suffix or field value to the file name when you need to preserve several versions.
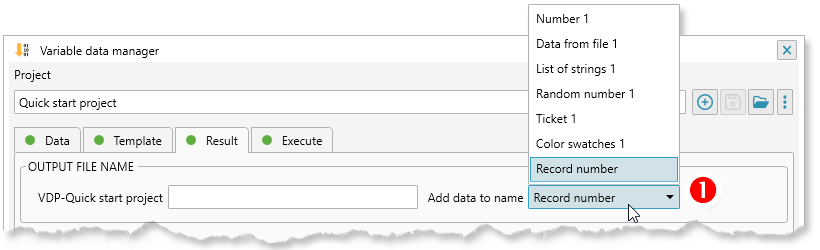
A field value can also be included in the output file name 1. Use an existing field or create one specifically for naming files. This is useful when a project produces many separate outputs. If no field is selected, the current generation-step number is used.
Saving generated variable data in a CSV file
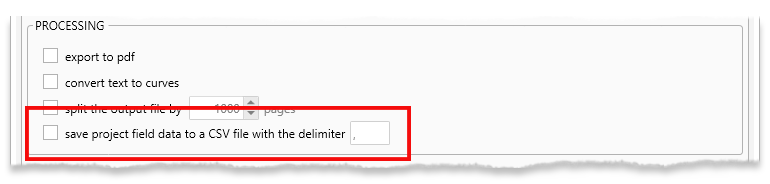
The Processing group contains the same CSV option for every output format. Enable save project field data to a CSV file with the delimiter and enter the one-character delimiter to export all generated field values. This is useful for verification, customer delivery, and further electronic processing, especially when the project contains random values that cannot be reconstructed manually. The CSV file is saved in the project working folder alongside the generated output.
Choosing an output format
The plugin can generate the finished job as a PDF, CorelDRAW document, or PPML file. PDF and PPML use specialized generation engines and normally produce files of approximately the same size in a similar amount of time. Both formats are considerably faster and more efficient than building every record through CorelDRAW. PDF is the most universal choice: it can be sent directly to a wide range of printing devices and is therefore selected by default for new projects. PPML offers comparable efficiency, but is a more specialized variable-data format intended for printing equipment and workflow software that explicitly supports it.
CorelDRAW output should mainly be selected when the variable objects depend on features that cannot be reproduced directly by the PDF or PPML generators: complex text effects, linked text frames, or variable image substitution. It is also useful when the generated records must remain available as ordinary CorelDRAW pages for manual editing. For typical jobs containing variable text and barcodes, direct PDF or PPML generation saves substantial processing time and produces a smaller output file.
Select the required format in the Output format group. Settings specific to the selected format, such as the PDF version or the PPML generation mode and record length, appear next to its format name. The Processing group below then shows only the operations available for that format.
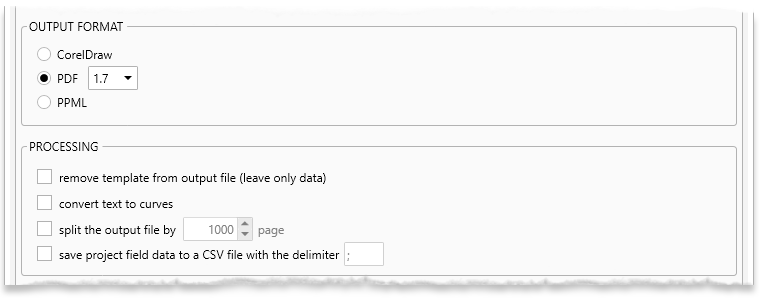
PDF is the recommended general-purpose output format and is selected by default for new projects. The plugin generates the pages directly, without creating and processing thousands of pages in CorelDRAW. This makes it possible to prepare large variable-data jobs quickly while keeping the resulting file compact. The finished PDF is immediately ready to be transferred to a RIP, print server, office printer, digital press, or another device that accepts PDF.
When PDF is selected, its version is chosen directly beside the format name. Versions from 1.3 through 1.7 are available; version 1.7 is the default for new projects. Select an earlier version when it is required by an older RIP, print server, or document workflow.
Direct PDF generation supports variable text fields and barcodes of all types available in the plugin, including designer QR codes. Text and barcode objects are placed into the PDF together with the constant part of the CorelDRAW template, producing a complete print-ready document.
The following PDF-specific operations are available in the Processing group:
- Remove template from output file (leave only data) generates a PDF containing only the variable objects, for workflows in which the background is printed or processed separately
- Convert text to curves converts both constant and variable text to vector outlines, preserving its appearance when the fonts may not be available in the destination workflow; the converted text is no longer searchable or editable as text
- Split the output file by starts a new PDF after the specified number of pages, making large jobs easier to transfer, process, and reprint in parts
- Save project field data to a CSV file writes the generated field values to a separate file using the delimiter entered in the adjacent box, as described above
For ordinary variable text and barcode projects, PDF is usually much faster than CorelDRAW output and creates a smaller file. Slow page-by-page generation through CorelDRAW is justified when variable objects use complex text effects, linked text frames, or substituted images, or when the result must remain editable as a CorelDRAW document. In other cases, PDF normally provides the simplest and most efficient route from the project to print.
In CorelDRAW output mode, the plugin creates a CDR file with the required number of pages and inserts the variable data into each record. This is the most flexible but also the slowest method because every page is built and processed by CorelDRAW.
A template normally contains constant objects and variable objects. Variable objects are generated separately for every record, while the constant part is handled by the first list in the Processing group 1. This template-placement control provides three choices:
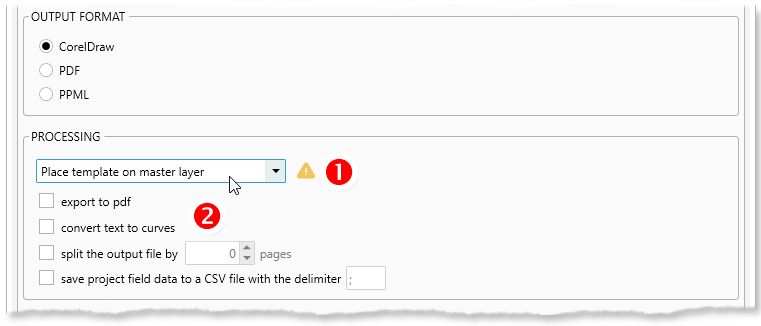
- Place template on master layer: move the unchanged objects of a single-page template to a master layer, reducing file size; variable data is placed above the master page, so the original object stacking order may change
- Remove template from output file: omit the constant objects from the CDR file and save the template separately as a PDF in the project folder
- Duplicate template on all records: copy both the constant and variable objects to every generated page. Use this when a multi-page template must retain a different constant design on each page.
The remaining processing options control how the generated pages are saved:
- Export to PDF 2 uses CorelDRAW to build every record and then saves the result as a PDF instead of a CDR file. Use this route when the job needs CorelDRAW-only effects or variable image substitution but the required delivery format is PDF.
- Convert text to curves converts both the constant and generated variable text to vector objects. This avoids missing-font substitutions, but the converted text can no longer be edited as text.
- Split the output file by divides a large CDR result — or a PDF exported through this mode — into files containing the specified number of pages. The practical page limit depends on template complexity and workstation resources.
- Save project field data to a CSV file saves the generated values separately using the selected delimiter, as described above.
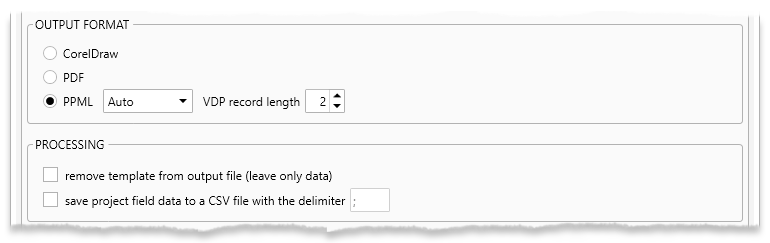
To speed up both generation and print processing, the plugin can create files in PPML format. This open standard was developed specifically for variable-data printing. PPML offers performance and file sizes comparable to direct PDF generation and is considerably faster and more compact than building a multi-page CorelDRAW document. It is, however, a more specialized format and should be selected when the target digital press, RIP, or workflow software explicitly supports PPML.
Selecting PPML displays its generation-mode list and VDP record length directly beside the format name in the Output format group. The list provides Auto, Graphics, and Text. In graphics mode, variable records are rendered as PDF resources. In text mode, the constant template remains in PDF while variable text and barcode data are written directly into the PPML/PostScript stream.
Text mode is the fastest option and can generate tens of thousands of variable records in seconds. It supports both variable text objects and barcodes. Text objects used in this mode must use embeddable Type 1 / PostScript fonts and must not be linked paragraph text frames. Variable images and unsupported visual effects require graphics mode or another output format.
- variable objects may be supported text shapes or barcode objects, but not substituted images
- variable text must use an embeddable Type 1 / PostScript font
- linked paragraph text frames and unsupported variable visual effects cannot be processed in text mode
Type 1 fonts use PostScript outlines and can be embedded efficiently in PPML text output.
By default, PPML is set to automatic mode. The plugin uses text mode whenever all variable objects are supported and automatically switches to graphics mode when the job contains incompatible objects or effects.
The PPML record length specifies how many consecutive pages the printing system treats as one set. This can be used with tray switching, for example when printing multipart carbonless forms on different paper stocks. For a three-part form, repeat each value three times and set the record length to 3 so that the press treats those three pages as one item.
The Processing group contains two options for PPML output:
- Remove template from output file (leave only data) excludes the constant background from the PPML output when the template and variable data must be processed separately. The template background remains available as a PDF in the project folder.
- Save project field data to a CSV file saves the generated values separately using the delimiter entered in the adjacent box, as described above.
Layout on a printed sheet
WATCH VIDEO: Layout on a printed sheet when generating variable data
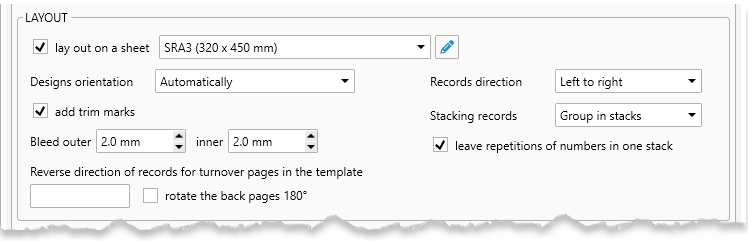
The plugin can impose generated records directly onto a printing sheet, producing a print-ready file without a separate layout step.
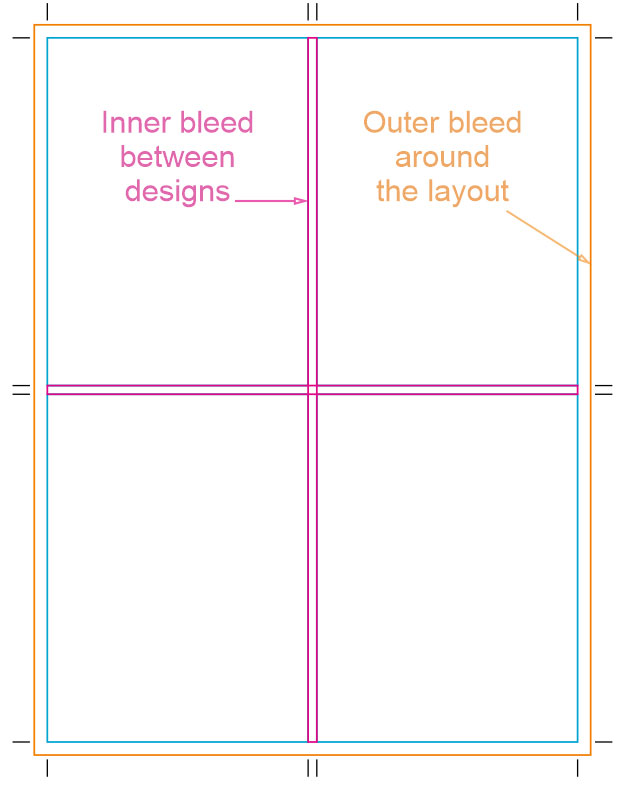
Inner and outer bleed values are configured for the whole layout, allowing records to be packed efficiently. Record orientation is selected automatically by default but can be fixed when required.
Enable impose into sheet, select the output sheet size, and configure bleed and trim marks. Available paper sizes and printing-mark settings are managed in the plugin settings, opened with the gear button .
Select the required record order for the imposed sheets:
- Group in stacks — arrange records for cut-and-stack production. After cutting on the trim marks, place the stacks on top of one another to restore the correct sequence.
- No stacking — fill each printing sheet sequentially before continuing with the next sheet.
In cut-and-stack mode, enable keep repeating numbers in one stack to prevent repeated values from being divided between stacks. This is important for multipart carbonless forms, where all layers carrying the same number must remain together.
For duplex work, back-side data may need to be arranged in the mirror order of the front side. Specify which template pages are backs so that the plugin can apply the correct order. Back pages can also be rotated by 180 degrees when required.
Default values through master projects
Output settings can vary significantly between jobs. To avoid repeating common setup, prepare standard projects and save them as master projects with the button. Their data-field and output settings can then be used as the starting point for new projects.
-
For example, you can create projects:
- a two-part carbonless form with each number repeated twice, PPML record length 2, and A3 imposition
- a three-part carbonless form with each number repeated three times, PPML record length 3, and A3 imposition
- a ticket with no repeated numbers, PDF or PPML output, and SRA3 imposition
Master projects speed up preparation and reduce configuration errors. The most frequently used master project can be selected as the default and will be offered first whenever you create a project with the button.
Generating variable data
After configuring the data fields, template, and output parameters, open the Execute tab. The project can be started only when the required settings are valid; detected problems are reported in the form status and must be corrected before generation.
Specify the total number of records required for the job 1. Usually this is the print-run quantity. For multi-layer carbonless forms, each layer is treated as a separate record, so the number of copies must be multiplied by the number of layers. The adjacent Created counter shows how many records have already been generated for the current project. It can be returned to zero with the button when you need to start counting again.
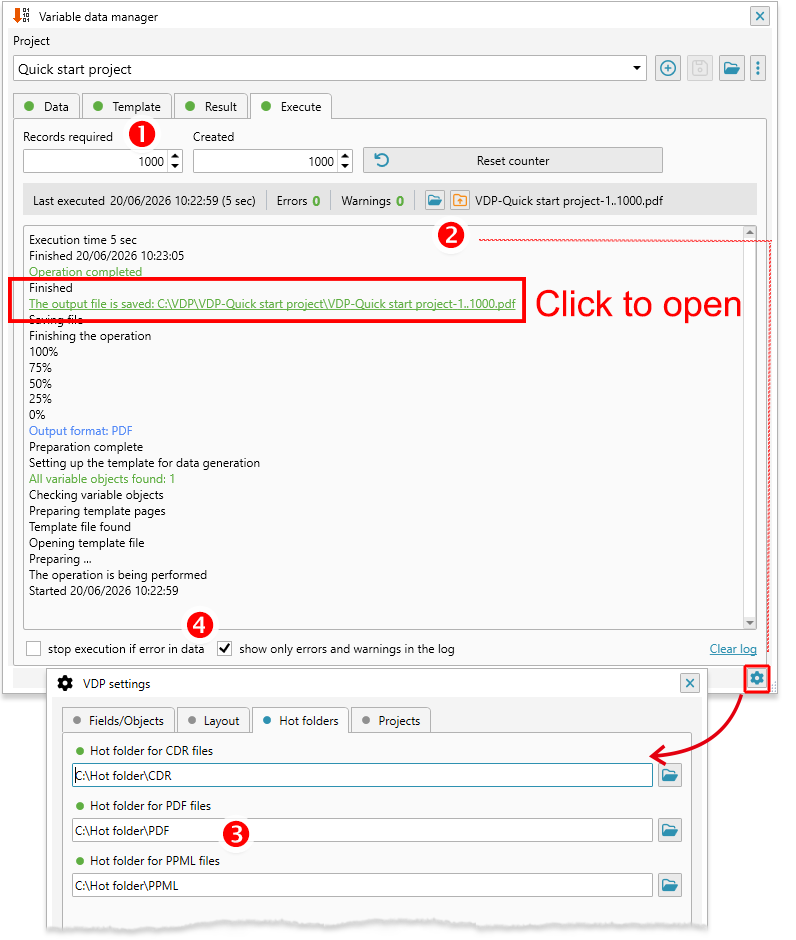
During generation, the counter and progress messages are updated continuously. If a run is stopped, the project can later continue with the next record. The resumed portion is written to a new output file rather than appended to the previous one. If imposition is enabled, the resumed portion is also imposed separately, so its sheet positions may not continue those of the first file.
The line above the log 2 summarizes the last run: its date and duration, the number of errors and warnings, and the generated file name. The log below records the stages of template preparation, variable-data generation, saving, completion time, and the final file path.
The show only errors and warnings in the log option 4 keeps only brief progress information and diagnostic messages. Disable it when you need a detailed record of generated and inserted values, but remember that detailed logging can slow down large jobs. The stop execution if error in data option stops generation when invalid data is encountered. If it is disabled, the plugin attempts to continue and substitutes an empty value where data cannot be generated.
Status bar of the generation log
After successful completion, the output file can be opened directly by clicking its green file name or path in the generation log. Alternatively, click the folder button in the result status line to open the project folder in Windows Explorer and locate the finished file there. For CDR output, an additional CorelDRAW button opens the generated document directly in CorelDRAW.
The second result button copies the finished file to a configured hot folder. Separate hot folders can be specified for CDR, PDF, and PPML files in the Hot folders tab of the plugin settings 3; the copy button is shown when a folder has been configured for the generated format. This provides a quick way to pass the result to a print server, RIP, or another automated workflow.
A hot folder is a service provided by the printing device or its workflow software. The plugin only copies the completed file to the configured location; further processing and sending to the printing equipment are performed by the corresponding external software.
Optimize your workflow
Once configured, the plugin can generate and deliver a print-ready variable-data file with only a few actions. The following practices help make the workflow faster and more reliable:
- Use master projects as presets for recurring jobs
- Impose records to the sheet size used on the press
- Use PDF as the universal fast output format, or PPML when it is supported by and appropriate for your printing workflow
- Use Type 1 / PostScript fonts for variable text when generating PPML in text mode
- Configure hot folders for the output formats used by your print workflow