ReproScripts Imposition Brochure layout plugin for CorelDraw
- automatic imposition of brochures for different types of binding
- adjusting the size of the brochure on the fly
- creep compensation based on the paper parameters
- all required scales, marks and indenting for the printing press
- fast setting up and full control over layout
The Brochure layout plugin is designed to perform a quick automatic brochure imposition taking into account the parameters of the printing equipment and the type of binding used. The plugin, unlike the standard CorelDraw tools, does not require a long setup. To create the imposition it is enough to specify only a few basic parameters. In addition, it allows to place on layouts all the necessary printing marks and other technical information that is required for correct operation of the equipment. For example, for offset printing, the plugin creates a file ready for output on the CTP device, correctly positioning the layout on the plate and adding the necessary service data. Also Brochure layout can be used to prepare brochures for digital and other types of printing where plates are not used.
Formed layouts are saved as CorelDraw files and the projects are kept in the plugin's library. This allows you to create an archive of completed work and easily return to the layout for control in case of problems with printing, or just quickly repeat the order.
Quick start
 WATCH VIDEO: Automated brochures layout in CorelDraw
In order to use the plugin, you must perform a presetting — this is described in detail later on this page. To quickly get started and understand how the plugin works, you need to follow these steps:
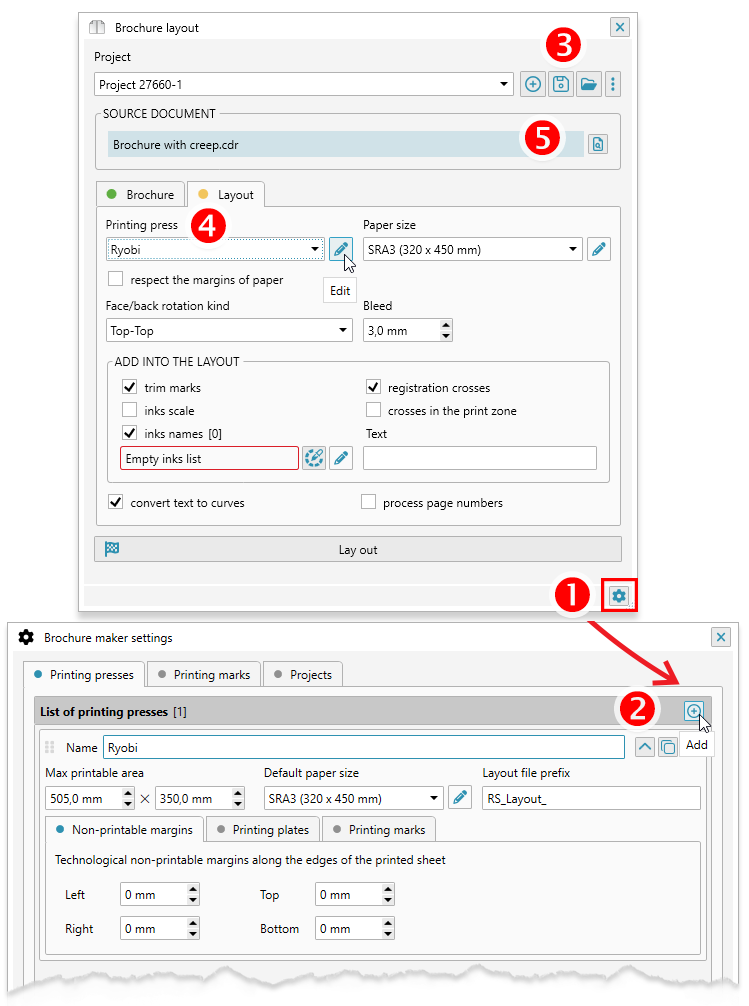
- Enter the settings of the plugin by clicking on the button with the gear icon in the lower right corner of the window 1 and add the printing machine whose parameters will be used for the layout. It is necessary to add a list of the sizes of the papers 2 supported by the press.
- In the project manager at the top of the form add a new project 3 by clicking and specifying the desired name
- Select a printing press and a paper to print on 4
- Open the document that you want to impose and add it to the project by clicking on the button 5
- Specify the type of binding and, if necessary, other parameters. Then do the imposition by pressing the button
How the plugin works
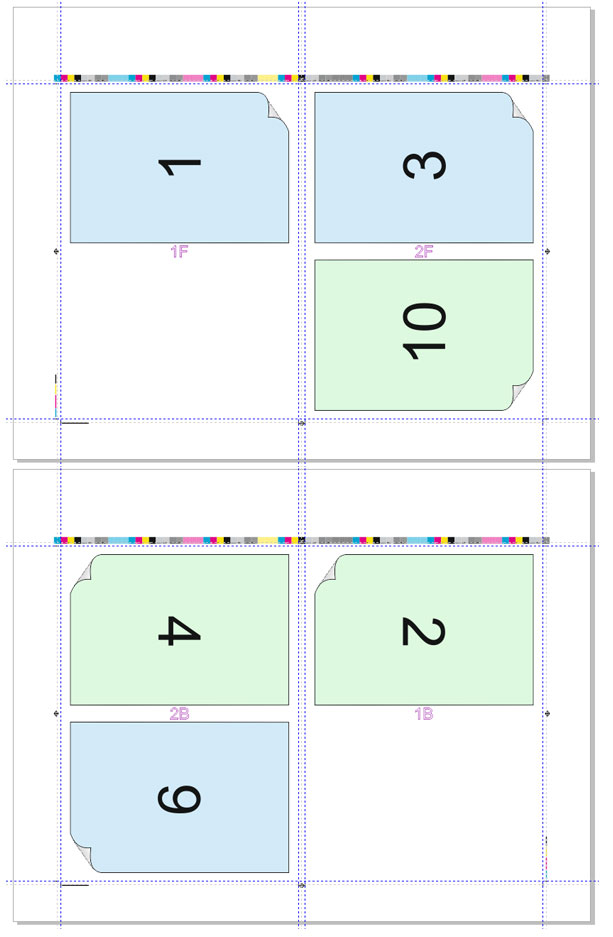
The plugin requires an open document with the pages of the brochure to be imposed. It calculates the correct position, size and orientation of each page in the finished layout given the required type of binding. Three types of binding are supported:
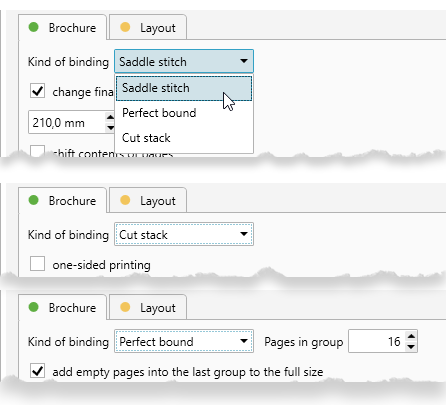
- Cut stack: the layout does not require folding, the printed sheet should be simply cut and put the stacked one on top of the other. If you select this type of binding, you have the option of layout for one-sided (tick off the checkbox one sided printing), or two-sided printing (by default)
- Saddle stitch: the imposition for the brochure with the binding in the middle, the printed sheets must be cut, folded and picked up in a brochure. The plugin performs rearrangement of pages and, if necessary, adds blank pages at the end
- Perfect bound: the imposition is executed as for saddle stitch, but in separate groups, the size of which must be specified. The number of pages in a group must be a multiple of 4, so that it can be folded. In some situations the last group may smaller then all other ones. For correct operation of the binding equipment, it may be necessary to keep the same size of all groups and therefore, in this case, the last (small) group need to be supplemented with the necessary number of blank pages. To do this, select the checkbox add empty pages to the last group to the full size
While executing the imposition, the plugin calculates the required number of printed sheets, arranges the necessary printed marks and places the brochure pages into them, taking into account the set value of the bleed.
When calculating the layout, the printable area is defined as minimal from the printable area of the press and the size of the paper used. Obviously, the whole layout including printing marks, should fit within it.
Printing machines, in terms of the plugin, are divided into those that use plates (= offset) or those for which plates are not required (= digit). The plugin determines the optimal orientation of the work (taking into account the front and back sides of the brochure sheets) and forms the layout.
If the parameters of the selected printing press indicate that it does not use plates, then the plugin's work is completed. For machines that use a plate, the plugin performs an additional positioning operation on the finished layout on the plate format and, optionally, adds graphics and text specified in the settings. This allows to create a layout file completely ready to be sent to CTP, in which all the necessary technological indents are taken into account and all the required information is added.
Setting up the printing press
For the plugin to work, information about the parameters of the printing press used is required. They can be specified in the plugin's settings by clicking on the button with the gear in the lower right corner of the form. The list of printing machines, and all their parameters, available in this form are shared between all ReproScripts plugins. Any changes will affect all of them.
Detailed configuration and all parameters of printing machines are described on the page of the Auto imposition plugin.
Projects management
Many of the ReproScripts plugins use projects to organize their work. Each project contains complete information for them to carry out the required task. Brochure layout keeps in projects the path for the source document used for imposition, selected printing press and paper, layout settings, etc.
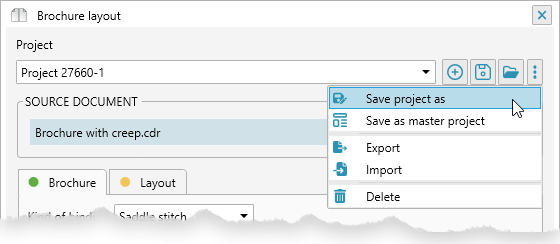
There is a project manager control at the top of the plugin's window. To create a new project, click the button and give it a name. As a name, we recommend using the job order number. This will allow you to easily navigate in the list of projects. If you make any changes to the project, you must save it by clicking on the button with a floppy disk .
To access additional project manager commands, you can click on the button. button - allows you to create a copy of the current project, saving it under a new name, will delete the current project.
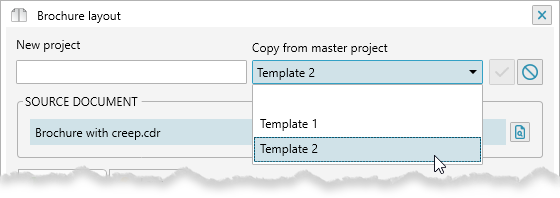
The plugin supports master projects. The master contains parameters that are reused during the creation of new projects. This approach exludes the need to re-enter the same data for each project and, at the same time, have any number of presets "by default".
-
For example, if you create
- Template 1 - in which Perect bound is already set with a group of 20 pages, offset press and color scale
- Template 2 - single-sided imposition Cut stack with 0 mm bleed, offset press and without scale
Then at the time of creating a new project, a list of templates will be available to choose from. Taking as a basis Template 1 we will receive a new project in which Perfect bound / 20 pages / 2 mm / offset / scale are set. If you take Template 2 as the basis, then the parameters Cut stack / single-sided / 0 mm / offset / without scale will be loaded into it. Any project can be saved as a template by clicking on the button. In this case, the project parameters will be copied to it, but not source document or color information - which change every time.
The source document with brochure pages
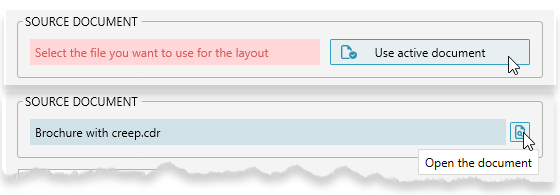
In the project, you need to specify the source document wich contains pages of the brochure that will be imposed. All pages must be the same size. When creating a new project, the plugin automatically picks up currently open CorelDraw document. If the source document is not specified, you need to open it and add it to the project.
It is important to note that the plug-in requires the source document to be opened in CorelDraw to fully check the brochure layout capability. It automatically checks the layout capability based on the set parameters and reports the result in the status bar. Therefore, if you opened a previously created project whose original document is not open, you must click the button to open and verify it.
Changing the size of the brochure
Initially, when the project is being formed, it is assumed that you need to create a brochure with the pages the same size as in the source document. However, it is often necessary to obtain a brochure of a different size. To do this, tick off the change the page size of the brochure checkbox and specify the desired final size. 1 The plugin will recalculate the imposition, perform the scaling and generate a CorelDraw file with ready-to-print sheets.
Choosing layout options
The most important information for the plugin, apart from the source document, is the indication of the printing press and the paper used. This data is used to accurately determine the maximum dimensions of the layout and its positioning on the printed sheet.
Below the list of the press there is a checkbox respect the margins of paper that allows to specify whether it is necessary to use in this particular layout non-printable paper margins specified in the press settings. Sometimes it is possible to create a more optimal layout by disabling the margins. At the same time, the operator should understand that the layout will be slightly larger than can be printed and some elements may not fit. Therefore, it will be necessary to check the result and make a decision. For example, if printing marks are not printed by 30-40% this should not affect the printing process too much, but can significantly reduce paper waste.
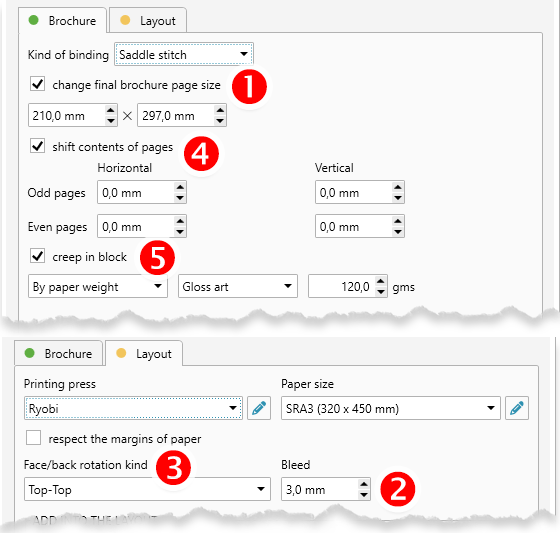
Bleed
The plugin allows you to add the bleed 2 around the cut-off borders of the brochure sheet when creating the layout. With Saddle stitch / Perfect bound layouts, the sheet is folded and the bleed for inner border of pages is removed - it is present only at the outer edges.
Back side rotation
When preparing the imposition for two-sided printing, you can specify the type of sheet flipping on the press 3
- Top-Top — horizontal sheet flipping. The upper edge of the front side of the printed sheet remains upper for the back side.
- Tob-Bottom — a vertical turn. The upper edge of the front side of the printed sheet becomes the bottom for the back side.
The rotation settings must be taken into account, since they affect the alignment of the front and back sides of the stations when performing the imposition.
Shifting the contents of pages
It is often desirable that the internal margins of the spreads differ from the outer ones. This does not always provided correctly at the design stage of the brochure layout. To compensate for this problem, the plugin proposes an option to move the content in pages horizontally or vertically separately for even and odd pages. 4 This feature allows you to quickly prepare for printing files which were not completely correctly made.
Creep compensation
In printing, page creep refers to the fanning out of pages that can occur when they’re folded and gathered together. As you fold more pages together, the thickness of the paper pushes the inner pages out. The amount of creep depends on the number of pages and the thickness of the paper.
Once the pages are folded and bound together, the final trim will cut off the edges of the innermost pages. In booklets with more than 48 pages, compensating for the inevitable creep requires incrementally shifting the pages in order to end up with a consistent outer margin.
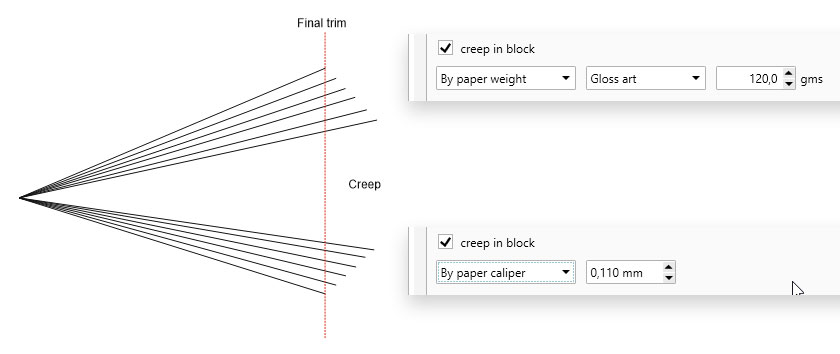
Adjusting for page creep manually on your own can be very time consuming. The ReproScripts Brochure layout plugin allows you to automatically calculate and apply the creep to the brochure pages in the layout.
The shift amount is calculated depending on the characteristics of the paper used for printing. 5 You can set the paper weight or paper thickness. Based on this data, as well as the number of pages and the way they are layouted, the plugin will determine and apply the appropriate amount of shift for those pages where it is required.
Page numbers
If automatic page numbering is used when creating the brochure, then in order to maintain the correct numbering when imposing, it is necessary to first fix the numbering. This operation requires checking and processing all text objects in the document, so it makes sense to perform it only when necessary. Check this box to activate processing. 6
List of colors
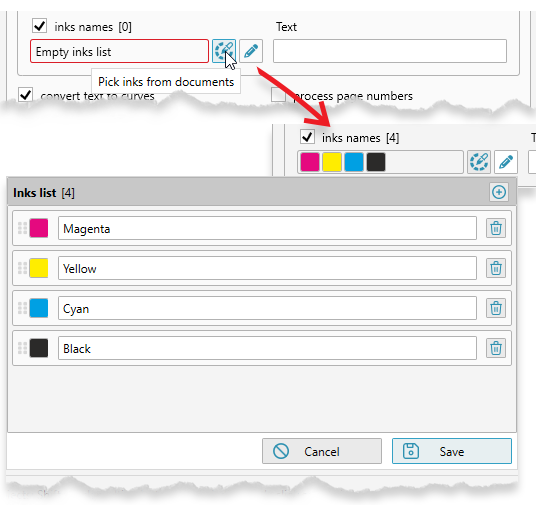
There is a table with a list of colors used in the document on the right hand side of the plugin's main window. The list of colors is used by the plugin to add their name to the layout, as well as when forming the color scale.
After you have chosen or changed the source document, click the button. The plugin will scan and add all the colors that are present in it. Only colors of models CMYK , Gray and Pantone are added. If the plugin detects the presence of other color models, all CMYK components will be added. The list can be adjusted manually — add, delete or change the name of the colors.
Printing marks
Almost always in the layout should be additional technological marks, allowing to properly configure the printing and subsequent finishing processes. The plugin allows to easely manage a set of placed printing marks.
It is important to understand that the plugin calculates the imposition taking into account the fact that all the marks must fit into the printed area of the sheet. In the plugin settings on the tab Printing marks you can adjust all the sizes of the elements. Also, individually for each printing press, it is possible to customize these values.
Trim marks
Trim marks are are required almost always and allow to cut the finished product into the desired format. In the settings for the trim marks, you can specify their length, thickness and distance from the cutting edge.
Registration crosses
These marks allow the printer to precisely align the separations during printing. This is relevant for offset printing. For digital printing the crosses can be used to align the front and back sides of the printed sheet.
Color scale

A color scale is often required for offset printing. It makes it possible to evaluate the uniformity and density of the inks distribution over the entire area of the printed sheet. The plugin forms a scale from all CMYK and Pantone colors present in the project. The scale includes color patches, elements for gray balance and dot gain control.
Ink names
For offset printing on each separation, you need to specify the name of the ink it supposed to be printed with. The plugin adds inks names next to the other printing marks. For digital printing, this is not necessary.
Guidelines
To control the resulting imposition file, the plugin can add guideliness into it in the positions of the horizontal and vertical trim marks and the centers of the crosses.
Additional text
The plugin automatically places text in the finished imposition which contains information on the working project, the estimated circulation of each imposition sheet, its number and the side. In addition, you can place any additional text in the layout.
Creating the brochure imposition
To launch the project, click on the button. It will be active if the plugin has enough information to perform the operation. If there is a problem with the parameters of the project an error message will be displayed in the status line at the bottom of the form.
The plugin can issue a warning on an orange background about an insufficiently optimal layout. The warning does not prevent you from trying to impose — the start button is active. The prepress operator should decide on the need for such a step.
The imposition process includes a lot of steps. If an error occurs on any of them, it will be added to the log. Having finished its work the plugin will report that there were problems. To view the log and find out what happened, click on the button with an exclamation mark in the status bar.
CorelDraw files with the imposed brochure
After completing the imposition, the final CorelDraw file is saved to the folder next to the source document. A separate subfolder is created with the name based on the project title. This allows to easily navigate in imposition results and return to them at any time.
You can open the folder with the result from the project manager by clicking on the button . This way you can instantly find the right document without having to navigate through a complex folder hierarchy.